AWS IoT core and MQTT services: connect Arduino SAMD (WiFiNINA) devices – 5
This article will continues the integration via AWS IoT with another kind of device, the fabulous Arduino SAMD family, which is very powerful and well built.
As for esp8266 and esp32, you must create a new thing with the relative certificate (or reuse the esp8266 thing but stop the other device).
Generate CSR for Arduino MRK WiFi 1010
As mentioned above, AWS IoT Core requires devices that connect using the MQTT protocol to use X.509 certificates for authentication. We’ll use a sketch to generate a Certificate Signing Request (CSR) on the board and then upload this CSR in the AWS console to create an X.509 certificate.
The CSR can be generated using an example sketch from the ArduinoECCX08 library.
- Open the example sketch in the Arduino IDE
File -> Examples -> ArduinoECCX08 -> Tools -> ECCX08CSR. - Click the “Upload” button to build and upload the sketch to your board;
- Open the Serial Monitor. Make sure the line ending configuration is set to “Both NL & CR.”
This sketch will prompt you to permanently configure your ATECC508A to ECC608A crypto element if it is not configured and locked. NOTE: This locking process is permanent and irreversible but is needed to use the crypto element – the configuration the sketch sets allows to use five private key slots with any cloud provider (or server), and a CSR can be regenerated any time for each of the other four slots. When the board is shipped from the factory, the crypto element is unconfigured and unlocked.
- After this, you will be prompted for information to include in the CSR, most entries can be left blank and except the “Common Name”, in the screenshot below “arduinoSAMD_relay” we’ll be using slot 0 to generate and store the private key used to sign the CSR (slots 1 to 4 can be used to generate and store additional private keys if needed). Note: Since the private key is generated inside the crypto element it never leaves the device and is stored securely and cannot be read.
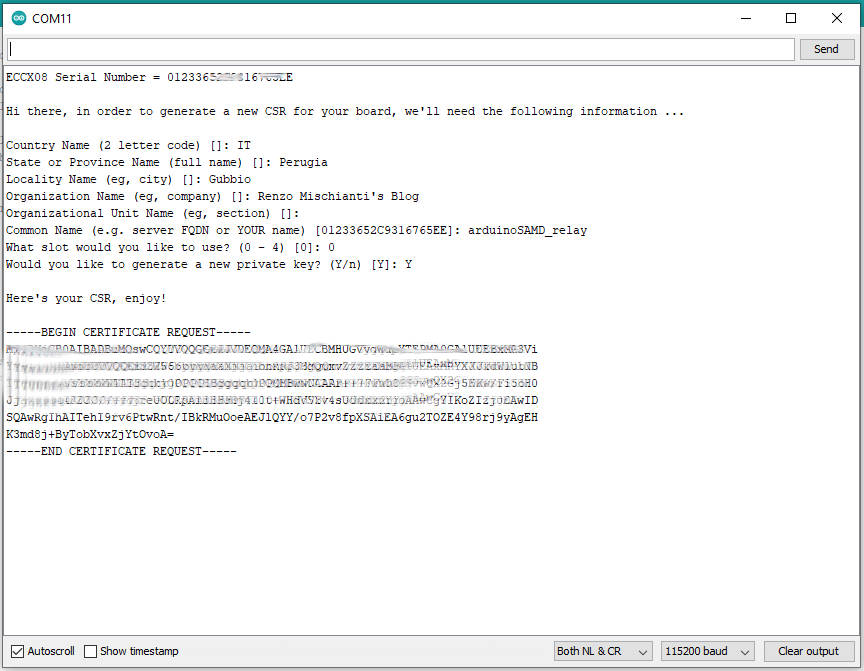
- Copy the generated CSR text including “—–BEGIN CERTIFICATE REQUEST—–” and “—–END CERTIFICATE REQUEST—–” and save it to a
ArduinoSAMD_CSR.txtinside the folder file.
Now that we have a CSR to identify the board, we need to login into the AWS console and create a certificate for it.
Create new thing
In the project you had already downloaded, check that the folder exists arduinoSAMD_relay_iot_core/certificates, if not, create It.
- In the AWS IoT console (IoT Core), choose from the left menù Manage and Things.
Or directly:
https://us-east-1.console.aws.amazon.com/iot/home?region=us-east-1#/thinghub (North America)
https://eu-west-1.console.aws.amazon.com/iot/home?region=eu-west-1#/thinghub (Europe) - Than click on Create button in the top right, than Register a single AWS IoT thing.
- Name the new thing arduinoSAMD_relay, and copy this also in the
setup.txtfile on[Device name]section. Leave the remaining fields set to their defaults. Choose Next. - Choose Create with CSR and select
ArduinoSAMD_CSR.txt.
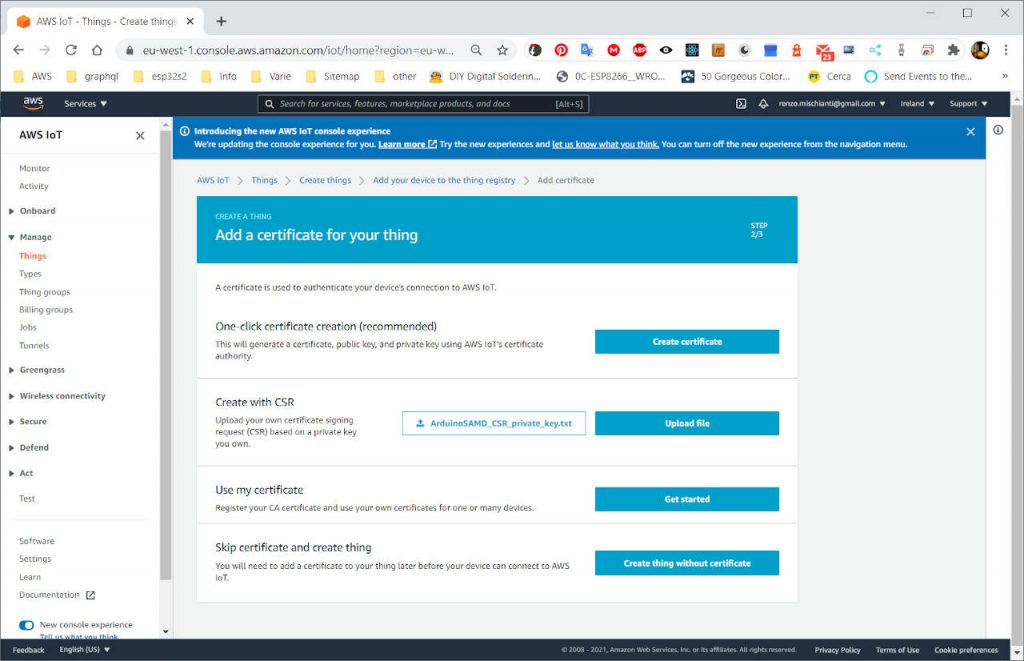
- Choose Upload file.
- Then click on Attach a policy.
- Select the policy already created, if you don’t create It click Done for now and check the article 2 “AWS IoT core and MQTT services: creating AWS thing with certificate and policy” where I explain che policy creation.
- Then click Register Thing.
- Now return to
Manage -> Things. - Select arduinoSAMD_relay.
- Now on left you can select Security.
- Click the certificate in the box.
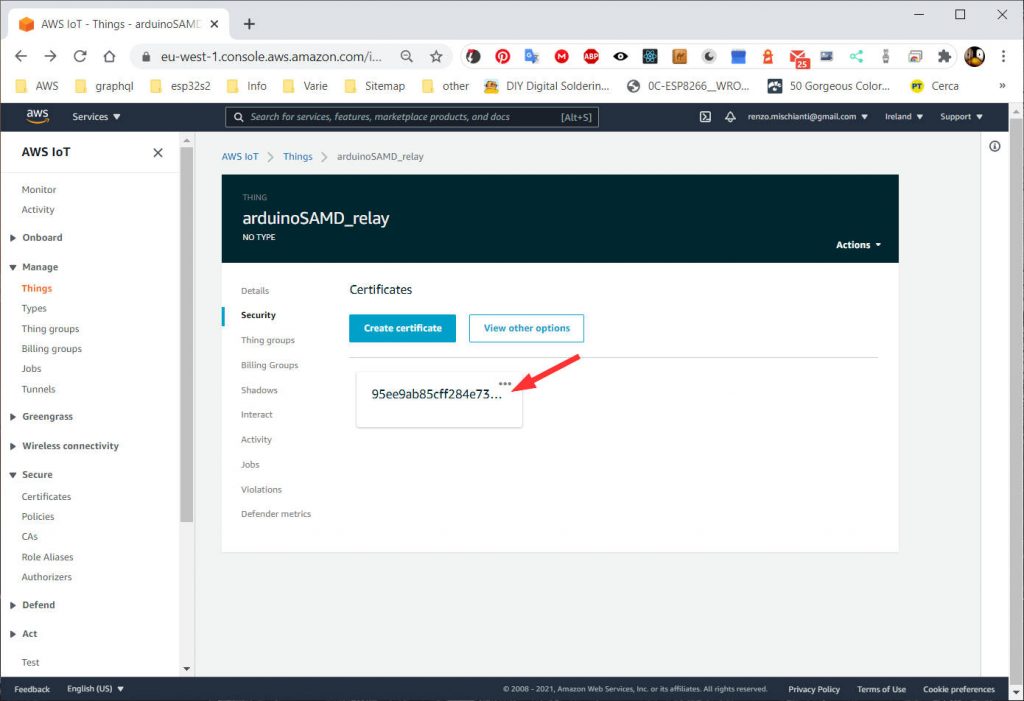
- Then in the menu Actions on up right, click Download.
- Put the file XXXXXXXXXX-certificate.pem.crt in the folder arduinoSAMD_relay_iot_core/certificates.

You can use the same policy esp8266_relay_policy we created in the last article, but you must change.
Modify policy to add new device
- To change policy you must go to AWS IoT Console;
- To the left menu you must click on Secure than in sub menu select Policies
https://eu-west-1.console.aws.amazon.com/iot/home?region=eu-west-1#/policy/esp8266_relay_policy (Europe)
https://us-east-1.console.aws.amazon.com/iot/home?region=us-east-1#/policy/esp8266_relay_policy (North America); - Click on
esp8266_relay_policy; - Click in the top right of the text of policy Edit policy document;
- All permission of subscription to topic is ready you must only add this lines
    {
      "Effect": "Allow",
      "Action": "iot:Connect",
      "Resource": "arn:aws:iot:[Region]:[Account ID]:client/arduinoSAMD_relay"
    },
arduinoSAMD_relay is the name of the thing created now.
- And now click on Save as new version.
Configure IDE
Now you need the device, then you need to configure your device to build and upload the code. To do this, you can refer to this article “Arduino SAMD NINA: pinout, specs, and Arduino IDE configuration“.
Source code
You can find the source code in the folder
alexa-skill-manage-relay/arduinoSAMD_relay_iot_core/sketch/aws_iot_core_arduino_SAMD
inside you find four file
aws_certificate.h
aws_parameter.h
wifi_credential.h
aws_iot_core_arduinoSAMD.ino
Configuration
And you must fill with this information
wifi_credential.h: put inside your WiFi SSID and password.
char WIFI_SSID[] = "<YOUR-SSID>";
char WIFI_PASSWORD[] = "<YOUR-PASSWD>";
aws_parameter.h: you have this file precompiled in some partTHINGNAMEis the name of thingesp32_relay;- AWS_IOT_ENDPOINT: is the value you had put on [IoT MQTT EndPoint], you find It in Settings section of AWS IoT Console;
- AWS_IOT_PUBLISH_TOPIC: is the publish topic [IoT MQTT publish topic], for our policy is
relay/pub; - AWS_IOT_SUBSCRIBE_TOPIC: is the publish topic [IoT MQTT subscribe topic], for our policy is
relay/sub;
#define THINGNAME "esp32_relay"
char AWS_IOT_ENDPOINT[] = "XXXXXXXXXXXXXX-ats.iot.eu-west-1.amazonaws.com";

#define AWS_IOT_PUBLISH_TOPIC   "relay/pub"
#define AWS_IOT_SUBSCRIBE_TOPIC "relay/sub"
aws_certificate.h:
This configuration file need to be fill with XXXXXXXXXX-certificate.pem.crt you download in the arduinoSAMD_relay_iot_core/certificates.
#include <avr/pgmspace.h>

// Device Certificate (XXXXXXXXXX-certificate.pem.crt)
// Fill in the boards public certificate
const char AWS_CERT_CRT[] = R"(
-----BEGIN CERTIFICATE-----
[...]
-----END CERTIFICATE-----
)";
For the other configuration file, refer to the article “AWS IoT core and MQTT services: connect esp8266 devices.”
Sketch
Here is the full sketch; as you can see, you must import three libraries to manage WiFi and security.
#include <WiFiNINA.h> // change to #include <WiFi101.h> for MKR1000
#include <ArduinoECCX08.h>
#include <ArduinoBearSSL.h>
- WiFiNINA (or WiFi101 for the MKR1000)
- ArduinoBearSSL
- ArduinoECCX08
You must use ArduinoECCX08.h to manage the internal crypto element; pay attention to using the correct slot.
Then here, we use the MQTT library from the Arduino libraries manager.
/*
 *   Amazon AWS IoT core connection from Arduino SAMD boards
 *
 *   This sketch securely connects to an AWS IoT using MQTT over WiFi.
 *   It uses a private key stored in the ATECC508A and a public
 *   certificate for SSL/TLS authetication.
 *
 *   It publishes a message every 5 seconds to arduino/pub
 *   topic and subscribes to messages on the arduino/sub
 *   topic.
 *
 *  by Mischianti Renzo <https://mischianti.org>
 *
 *  https://mischianti.org
 *
 */
#include "Arduino.h"
#include "aws_certificate.h"
#include "aws_parameter.h"
#include "wifi_credential.h"

#include <WiFiNINA.h> // change to #include <WiFi101.h> for MKR1000
#include <ArduinoECCX08.h>
#include <ArduinoBearSSL.h>

#include <MQTTClient.h>
#include <ArduinoJson.h>

// Secure connection
WiFiClient    wifiClient;            // Used for the TCP socket connection
BearSSLClient client(wifiClient); // Used for SSL/TLS connection, integrates with ECC508
// Client MQTT
MQTTClient clientMQTT = MQTTClient(256);

// Callback for every message on the topic subscribed
void messageCallback(String &topic, String &payload);
// Establish connection to MQTT
bool manageAWSConnection();
// Subscribe topic
bool manageAWSSubscription();
// Publish message to topic
bool publishMessage();

unsigned long getTime() {
  // get the current time from the WiFi module
  return WiFi.getTime();
}

void setup()
{
	Serial.begin(115200);
	while(!Serial){}
	Serial.flush();
	Serial.println();

	  if (!ECCX08.begin()) {
		Serial.println("No ECCX08 present!");
		while (1);
	  }

	  // Set a callback to get the current time
	  // used to validate the servers certificate
	  ArduinoBearSSL.onGetTime(getTime);

	  // Set the ECCX08 slot to use for the private key
	  // and the accompanying public certificate for it
	  client.setEccSlot(0, (const char*)AWS_CERT_CRT);

	// WIFI_SSID, WIFI_PASSWORD Stored on wifi_credential.h file
	WiFi.begin(WIFI_SSID, WIFI_PASSWORD);

	Serial.print("Connecting to ");
	Serial.print(WIFI_SSID); Serial.println("");

	int i = 0;
	while (WiFi.status() != WL_CONNECTED) { // Wait for the Wi-Fi to connect
		delay(1000);
		Serial.print(++i); Serial.print('.');
	}

	Serial.println('\n');
	Serial.println("Connection established!");
	Serial.print("IP address:\t");
	Serial.println(WiFi.localIP());         // Send the IP address of the ESP8266 to the computer

	if (manageAWSConnection()){
		manageAWSSubscription();
	}
}

unsigned long lastSendingTime = millis();
unsigned long sendMessageEveryMillis = 5000;

void loop()
{
	clientMQTT.loop();
	if (lastSendingTime+sendMessageEveryMillis<millis()){
		publishMessage();
		lastSendingTime = millis();
	}
}

bool manageAWSConnection(){
	// Connect to the MQTT broker on the AWS endpoint
	clientMQTT.begin(AWS_IOT_ENDPOINT, 8883, client);

	// Create a message handler
	clientMQTT.onMessage(messageCallback);

	Serial.print("Connecting to AWS IOT");

	while (!clientMQTT.connect(THINGNAME)) {
		Serial.print(".");
		delay(100);
	}

	if(!clientMQTT.connected()){
		Serial.println("AWS IoT Timeout!");
		return false;
	}
	return true;
}

bool manageAWSSubscription(){
	  // Subscribe to a topic
	  if (clientMQTT.subscribe(AWS_IOT_SUBSCRIBE_TOPIC)){
		  Serial.println("AWS IoT Connected!");
		  return true;
	  }else{
		  Serial.print("AWS IoT ERROR: ");
		  Serial.println(clientMQTT.lastError());
		  return false;
	  }
}

void messageCallback(String &topic, String &payload) {
	Serial.println("incoming: [" + topic + "]" );
	Serial.println("---------------------------" );

	StaticJsonDocument<200> doc;
	deserializeJson(doc, payload);
	serializeJsonPretty(doc, Serial);
	Serial.println();
	Serial.println("---------------------------" );
}

bool publishMessage()
{
	// Create simple message
	DynamicJsonDocument doc(512);

	doc["time"] = millis();
	doc["deviceName"] = "Arduino SAMD";
	doc["status"] = "OK";

	char jsonBuffer[512];
	serializeJson(doc, jsonBuffer); // print to client

	Serial.print("Message on ");
	Serial.print(AWS_IOT_PUBLISH_TOPIC);
	Serial.print(" topic... ");
	// Publish message to AWS_IOT_PUBLISH_TOPIC
	if (clientMQTT.publish(AWS_IOT_PUBLISH_TOPIC, jsonBuffer)){
		Serial.println("Published!");
		return true;
	}else{
		Serial.println("Error!");
		return false;
	}
}
You can also use the ArduinoMqttClient standard library to get the same result.
/*
 *   Amazon AWS IoT core connection from Arduino SAMD boards
 *
 *   This sketch securely connects to an AWS IoT using MQTT over WiFi.
 *   It uses a private key stored in the ATECC508A and a public
 *   certificate for SSL/TLS authetication.
 *   With ArduinoMqttClient library.
 *
 *   It publishes a message every 5 seconds to arduino/pub
 *   topic and subscribes to messages on the arduino/sub
 *   topic.
 *
 *  by Mischianti Renzo <https://mischianti.org>
 *
 *  https://mischianti.org
 *
 */

#include "aws_certificate.h"
#include "aws_parameter.h"
#include "wifi_credential.h"

#include <ArduinoBearSSL.h>
#include <ArduinoECCX08.h>
#include <ArduinoMqttClient.h>
#include <WiFiNINA.h> // change to #include <WiFi101.h> for MKR1000
#include <ArduinoJson.h>

/////// Enter your sensitive data in arduino_secrets.h

WiFiClient    wifiClient;            // Used for the TCP socket connection
BearSSLClient sslClient(wifiClient); // Used for SSL/TLS connection, integrates with ECC508
MqttClient    mqttClient(sslClient);

unsigned long lastMillis = 0;

unsigned long getTime();
void onMessageReceived(int messageSize);
void connectWiFi();
void connectMQTT();
bool publishMessage();

void setup() {
  Serial.begin(115200);
  while (!Serial);

  if (!ECCX08.begin()) {
    Serial.println("No ECCX08 present!");
    while (1);
  }

  // Set a callback to get the current time
  // used to validate the servers certificate
  ArduinoBearSSL.onGetTime(getTime);

  // Set the ECCX08 slot to use for the private key
  // and the accompanying public certificate for it
  sslClient.setEccSlot(0, AWS_CERT_CRT);

  // Optional, set the client id used for MQTT,
  // each device that is connected to the broker
  // must have a unique client id. The MQTTClient will generate
  // a client id for you based on the millis() value if not set
  //
  mqttClient.setId(THINGNAME);

  // Set the message callback, this function is
  // called when the MQTTClient receives a message
  mqttClient.onMessage(onMessageReceived);
}

void loop() {
  if (WiFi.status() != WL_CONNECTED) {
    connectWiFi();
  }

  if (!mqttClient.connected()) {
    // MQTT client is disconnected, connect
    connectMQTT();
  }

  // poll for new MQTT messages and send keep alives
  mqttClient.poll();

  // publish a message roughly every 5 seconds.
  if (millis() - lastMillis > 5000) {
    lastMillis = millis();

    publishMessage();
  }
}

unsigned long getTime() {
  // get the current time from the WiFi module
  return WiFi.getTime();
}

void connectWiFi() {
  Serial.print("Attempting to connect to SSID: ");
  Serial.print(WIFI_SSID);
  Serial.print(" ");

  while (WiFi.begin(WIFI_SSID, WIFI_PASSWORD) != WL_CONNECTED) {
    // failed, retry
    Serial.print(".");
    delay(5000);
  }
  Serial.println();

  Serial.println("You're connected to the network");
  Serial.println();
}

void connectMQTT() {
  Serial.print("Attempting to MQTT broker: ");
  Serial.print(AWS_IOT_ENDPOINT);
  Serial.println(" ");

  while (!mqttClient.connect(AWS_IOT_ENDPOINT, 8883)) {
    // failed, retry
    Serial.print(".");
    delay(5000);
  }
  Serial.println();

  Serial.println("You're connected to the MQTT broker");
  Serial.println();

  // subscribe to a topic
  mqttClient.subscribe(AWS_IOT_SUBSCRIBE_TOPIC);
}

bool publishMessage()
{
	// Create simple message
	DynamicJsonDocument doc(512);

	doc["time"] = millis();
	doc["deviceName"] = "Arduino SAMD";
	doc["status"] = "OK";

	char jsonBuffer[512];
	size_t buffSize = serializeJson(doc, jsonBuffer); // print to client

	Serial.print("Message on ");
	Serial.print(AWS_IOT_PUBLISH_TOPIC);
	Serial.print(" topic... ");
	// Publish message to AWS_IOT_PUBLISH_TOPIC
	mqttClient.beginMessage(AWS_IOT_PUBLISH_TOPIC,(unsigned long)buffSize);
	mqttClient.print(jsonBuffer);
	if(mqttClient.endMessage() == 1){
		Serial.println("Published!");
		return true;
	}else{
		Serial.println("Error!");
		return false;
	}
}


void onMessageReceived(int messageSize) {
	Serial.println("incoming: [" + mqttClient.messageTopic() + "]" );
	Serial.println("---------------------------" );

	StaticJsonDocument<200> doc;
	deserializeJson(doc, mqttClient);
	serializeJsonPretty(doc, Serial);
	Serial.println();
	Serial.println("---------------------------" );
}
Thanks
- AWS IoT core and MQTT services: introduction and prerequisite
- AWS IoT core and MQTT services: creating AWS thing with certificate and policy
- AWS IoT core and MQTT services: connect esp8266 devices
- AWS IoT core and MQTT services: connect esp32 devices
- AWS IoT core and MQTT services: connect Arduino SAMD (WiFiNINA) devices
- AWS IoT core and MQTT services: test with console and MQTT.fx