AWS IoT core and MQTT services: connect esp32 devices – 4
In this article, we continue the part of articles related to integration with another type of device belonging to the esp32 family, which is very powerful and versatile.
As for esp8266, you must create a new thing with the relative certificate (or reuse the esp8266 thing but stop the other device).
Create new thing
In the project you had already downloaded, check that the folder esp32_relay_iot_core/certificates, if not created, create It.
- In the AWS IoT console (IoT Core), choose from the left menù Manage and Things.
Or directly:
https://us-east-1.console.aws.amazon.com/iot/home?region=us-east-1#/thinghub (North America)
https://eu-west-1.console.aws.amazon.com/iot/home?region=eu-west-1#/thinghub (Europe) - Than click on Create button in the top right, than Register a single AWS IoT thing.
- Name the new thing esp32_relay, and copy this also in the
setup.txtfile on[Device name]section. Leave the remaining fields set to their defaults. Choose Next. - Choose Create certificate.
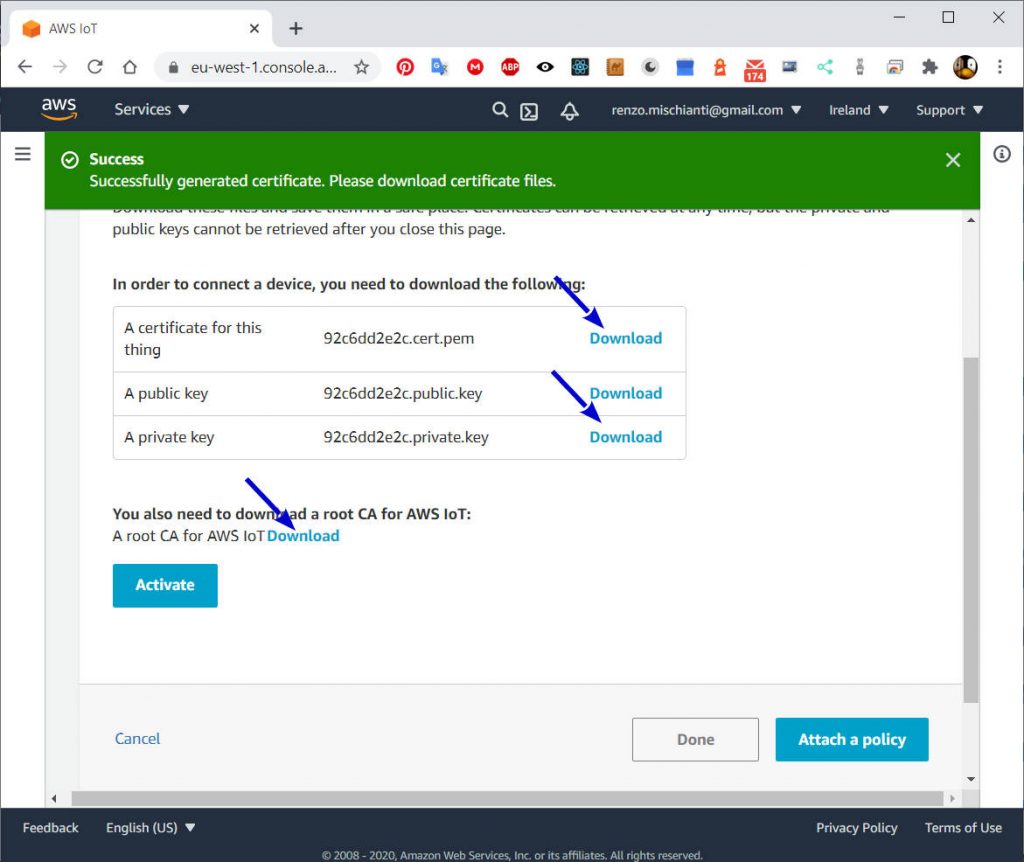
- Download inside the folder
esp32_relay_iot_core/certificates: Thing cert/Certificato per questo Oggetto, private key/chiave privata, than click near A CA root per AWS IoT the Download link, and select Amazon Root CA 1. - Choose Activate.
- Then click on Attach a policy.
- Select the policy already created, if you don’t create It click Done for now and check the article 2 “AWS IoT core and MQTT services: creating AWS thing with certificate and policy” where I explain che policy creation.
But pay attention; you can’t connect esp32 and esp8266 simultaneously with the same certificate.
So if you want to connect these two devices simultaneously, you must create a new AWS thing with a Certificate and policy. So do all the relative steps and change esp8266 in esp32.
You can use the same policy esp8266_relay_policy we created in the last article, but you must make a change.
Modify policy to add new device
- To change policy you must go to AWS IoT Console;
- To the left menu you must click on Secure than in sub menu select Policies
https://eu-west-1.console.aws.amazon.com/iot/home?region=eu-west-1#/policy/esp8266_relay_policy (Europe)
https://us-east-1.console.aws.amazon.com/iot/home?region=us-east-1#/policy/esp8266_relay_policy (North America); - Click on
esp8266_relay_policy; - Click in the top right of the text of policy Edit policy document;
- All permission of subscription to topic is ready you must only add this lines
    {
      "Effect": "Allow",
      "Action": "iot:Connect",
      "Resource": "arn:aws:iot:[Region]:[Account ID]:client/esp32_relay"
    },
esp32_relay is the name of the thing created now.
- And now click on Save as new version.
Configure IDE
As for esp8266, you first need the device, then configure your device to build and upload the code. To do this, you can refer to this article “ESP32: pinout, specs and Arduino IDE configuration“.
You can find esp32 here ESP32 Dev Kit v1 - TTGO T-Display 1.14 ESP32 - NodeMCU V3 V2 ESP8266 Lolin32 - NodeMCU ESP-32S - WeMos Lolin32 - WeMos Lolin32 mini - ESP32-CAM programmer - ESP32-CAM bundle - ESP32-WROOM-32 - ESP32-S
Example code
You can find the source code in the folder
alexa-skill-manage-relay/esp32_relay_iot_core/sketch/aws_iot_core_esp32
inside you find four file
aws_certificate.h
aws_parameter.h
wifi_credential.h
aws_iot_core_esp32.ino
Configuration
And you must fill with this information
wifi_credential.h: put inside your WiFi SSID and password.
char WIFI_SSID[] = "<YOUR-SSID>";
char WIFI_PASSWORD[] = "<YOUR-PASSWD>";
aws_parameter.h: you have this file precompiled in some partTHINGNAMEis the name of thingesp32_relay;- AWS_IOT_ENDPOINT: is the value you had put on [IoT MQTT EndPoint], you find It in Settings section of AWS IoT Console;
- AWS_IOT_PUBLISH_TOPIC: is the publish topic [IoT MQTT publish topic], for our policy is
relay/pub; - AWS_IOT_SUBSCRIBE_TOPIC: is the publish topic [IoT MQTT subscribe topic], for our policy is
relay/sub;
#define THINGNAME "esp32_relay"
char AWS_IOT_ENDPOINT[] = "XXXXXXXXXXXXXX-ats.iot.eu-west-1.amazonaws.com";

#define AWS_IOT_PUBLISH_TOPIC   "relay/pub"
#define AWS_IOT_SUBSCRIBE_TOPIC "relay/sub"
aws_certificate.h:
this file have 3 section one for every certificate and key we have download, the only change from esp8266 version is that use char instead of uint8_t
#include <pgmspace.h>

// Amazon Root CA 1 (AmazonRootCA1.pem)
static const char AWS_CERT_CA[] PROGMEM = R"EOF(
-----BEGIN CERTIFICATE-----
[...]
-----END CERTIFICATE-----
)EOF";

// Device Certificate (XXXXXXXXXX-certificate.pem.crt)
static const char AWS_CERT_CRT[] PROGMEM = R"KEY(
-----BEGIN CERTIFICATE-----
[...]
-----END CERTIFICATE-----
)KEY";

// Device Private Key (XXXXXXXXXX-private.pem.key)
static const char AWS_CERT_PRIVATE[] PROGMEM = R"KEY(
-----BEGIN RSA PRIVATE KEY-----
[...]
-----END RSA PRIVATE KEY-----
)KEY";
Sketch
Remember to download ArduinoJSON and MQTT library
Here is the complete sketch; as you can see, It’s pretty similar to esp8266; the only difference is how to set the CA to WiFiClientSecure.
/*
 *   Amazon AWS IoT core connection from esp8266 boards
 *
 *   This sketch securely connects to an AWS IoT using MQTT over WiFi.
 *   With MQTT library.
 *
 *   It publishes a message every 5 seconds to arduino/pub
 *   topic and subscribes to messages on the arduino/sub
 *   topic.
 *
 *  by Mischianti Renzo <https://mischianti.org>
 *
 *  https://mischianti.org
 *
 */
#include "Arduino.h"
#include "aws_certificate.h"
#include "aws_parameter.h"
#include "wifi_credential.h"

#include "WiFi.h"
#include "WiFiClientSecure.h"

#include <MQTTClient.h>
#include <ArduinoJson.h>

// Secure connection
WiFiClientSecure client = WiFiClientSecure();
// Client MQTT
MQTTClient clientMQTT = MQTTClient(256);

// Callback for every message on the topic subscribed
void messageCallback(String &topic, String &payload);
// Establish connection to MQTT
bool manageAWSConnection();
// Subscribe topic
bool manageAWSSubscription();
// Publish message to topic
bool publishMessage();

void setup()
{
	Serial.begin(115200);
	while(!Serial){}
	Serial.flush();
	Serial.println();

	// WIFI_SSID, WIFI_PASSWORD Stored on wifi_credential.h file
	WiFi.begin(WIFI_SSID, WIFI_PASSWORD);

	Serial.print("Connecting to ");
	Serial.print(WIFI_SSID); Serial.println("");

	int i = 0;
	while (WiFi.status() != WL_CONNECTED) { // Wait for the Wi-Fi to connect
		delay(1000);
		Serial.print(++i); Serial.print('.');
	}

	Serial.println('\n');
	Serial.println("Connection established!");
	Serial.print("IP address:\t");
	Serial.println(WiFi.localIP());         // Send the IP address of the ESP8266 to the computer

	if (manageAWSConnection()){
		manageAWSSubscription();
	}
}

unsigned long lastSendingTime = millis();
unsigned long sendMessageEveryMillis = 5000;

void loop()
{
	clientMQTT.loop();
	if (lastSendingTime+sendMessageEveryMillis<millis()){
		publishMessage();
		lastSendingTime = millis();
	}
}

bool manageAWSConnection(){
	// Configure WiFiClientSecure for the AWS IoT device certificate
	client.setCACert(AWS_CERT_CA);
	client.setCertificate(AWS_CERT_CRT);
	client.setPrivateKey(AWS_CERT_PRIVATE);

	// Connect to the MQTT broker on the AWS endpoint
	clientMQTT.begin(AWS_IOT_ENDPOINT, 8883, client);

	// Create a message handler
	clientMQTT.onMessage(messageCallback);

	Serial.print("Connecting to AWS IOT");

	while (!clientMQTT.connect(THINGNAME)) {
		Serial.print(".");
		delay(100);
	}

	if(!clientMQTT.connected()){
		Serial.println("AWS IoT Timeout!");
		return false;
	}
	return true;
}

bool manageAWSSubscription(){
	  // Subscribe to a topic
	  if (clientMQTT.subscribe(AWS_IOT_SUBSCRIBE_TOPIC)){
		  Serial.println("AWS IoT Connected!");
		  return true;
	  }else{
		  Serial.print("AWS IoT ERROR: ");
		  Serial.println(clientMQTT.lastError());
		  return false;
	  }
}

void messageCallback(String &topic, String &payload) {
	Serial.println("incoming: [" + topic + "]" );
	Serial.println("---------------------------" );

	StaticJsonDocument<200> doc;
	deserializeJson(doc, payload);
	serializeJsonPretty(doc, Serial);
	Serial.println();
	Serial.println("---------------------------" );
}

bool publishMessage()
{
	// Create simple message
	DynamicJsonDocument doc(512);

	doc["time"] = millis();
	doc["deviceName"] = "esp32";
	doc["status"] = "OK";

	char jsonBuffer[512];
	serializeJson(doc, jsonBuffer); // print to client

	Serial.print("Message on ");
	Serial.print(AWS_IOT_PUBLISH_TOPIC);
	Serial.print(" topic... ");
	// Publish message to AWS_IOT_PUBLISH_TOPIC
	if (clientMQTT.publish(AWS_IOT_PUBLISH_TOPIC, jsonBuffer)){
		Serial.println("Published!");
		return true;
	}else{
		Serial.println("Error!");
		return false;
	}
}
Thanks
- AWS IoT core and MQTT services: introduction and prerequisite
- AWS IoT core and MQTT services: creating AWS thing with certificate and policy
- AWS IoT core and MQTT services: connect esp8266 devices
- AWS IoT core and MQTT services: connect esp32 devices
- AWS IoT core and MQTT services: connect Arduino SAMD (WiFiNINA) devices
- AWS IoT core and MQTT services: test with console and MQTT.fx