AWS IoT core and MQTT services: introduction and prerequisites – 1
It’s time to connect our device to AWS IoT core via MQTT services. In this tutorial, we’ll connect an esp32, an esp8266, and an Arduino MKT 1010 WiFi to these services.
The service that we will use is MQTT, a messaging protocol created for IoT devices.
MQTT is an OASIS standard messaging protocol for the Internet of Things (IoT). It is designed as an extremely lightweight publish/subscribe messaging transport that is ideal for connecting remote devices with a small code footprint and minimal network bandwidth. MQTT today is used in a wide variety of industries, such as automotive, manufacturing, telecommunications, oil and gas, etc.
mqtt.org
We have already learned how to create a basic Amazon Alexa SmartHome skill structure, but we hadn’t attached devices. Now we will develop the sketch and relative AWS layer to manage external devices.
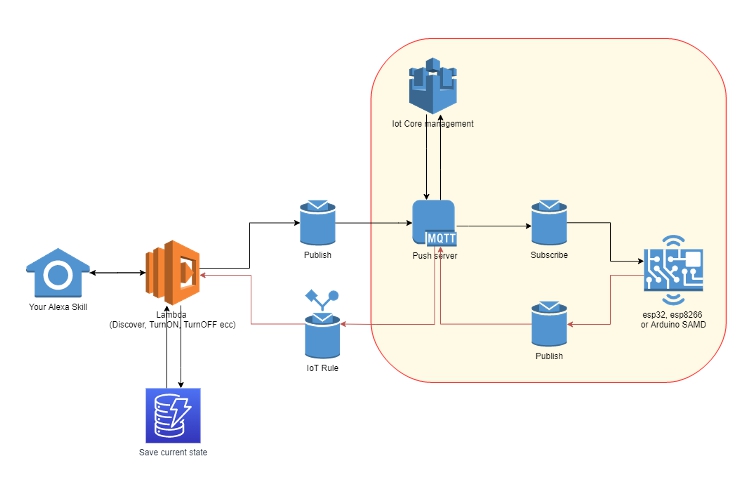
We are now at this point on the schema:
Prerequisites
First, you must create the accounts.
- An Amazon Web Services (AWS) account. This is required to manage the IoT core and all security settings.
- An Arduino IDE (or equivalent) with esp8266 (WeMos D1 mini (esp8266), pinout, specs and IDE configuration) or esp32 (ESP32: pinout, specs and Arduino IDE configuration) o Arduino SAMD (Arduino SAMD NINA: pinout, specs and Arduino IDE configuration) boards installed, to write the relative client code.
- An esp32 or esp8266 and a simple led for now.
Here an esp8266 WeMos D1 mini - NodeMCU V2 V2.1 V3 - esp01 - esp01 programmer
Here an esp32 ESP32 Dev Kit v1 - TTGO T-Display 1.14 ESP32 - NodeMCU V3 V2 ESP8266 Lolin32 - NodeMCU ESP-32S - WeMos Lolin32 - WeMos Lolin32 mini - ESP32-CAM programmer - ESP32-CAM bundle - ESP32-WROOM-32 - ESP32-S
Here the Arduino SAMD Amazon Arduino MKR WiFi 1010
Code and resources
If you had followed the previous series of articles about “Alexa SmartHome Skill“, you have already done these steps, so go ahead.
First, create a folder; for me, I create
alexa-skill-manage-relay
Get the setup-template.txt file from
https://github.com/xreef/alexa-skill-manage-relay-nodejs
and rename in setup.txt.
The file should contain:
[Login with Amazon Client ID]
amzn1.application-oa2-client.XXXXXXXXXXXXXXXXXXXXXXXXXXXXXXXX

[Login with Amazon Client Secret]
XXXXXXXXXXXXXXXXXXXXXXXXXXXXXXXXXXXXXXXXXXXXXXXXXXXXXXXXXXXXXXXX

[Alexa Skill Application ID]
amzn1.ask.skill.XXXXXXXX-XXXX-XXXX-XXXX-XXXXXXXXXXXX

[AWS Lambda ARN]
arn:aws:lambda:us-east-1:XXXXXXXXXXXX:function:skill-sample-language-smarthome-switch

[Redirect URLs]
https://pitangui.amazon.com/api/skill/link/XXXXXXXXXXXXXX
https://layla.amazon.com/api/skill/link/XXXXXXXXXXXXXX
https://alexa.amazon.co.jp/api/skill/link/XXXXXXXXXXXXXX

[DynamoDB table]
XXXXXXX

[Device end point]
XXXXXXXX
Install Optional Tools
These tools are optional as they are helpful but not required.
Git
Git 2.0 or greater is required only if you want to clone the source code locally. At a command line, you can verify if git is installed by running the command:
git --version
If it is not correctly installed or is not a version greater than 2.0, visits https://git-scm.com/downloads to download and install a version for your platform.
Get the Source Code via Git
If you have git installed on your workstation, you can use the following instructions to pull the source code into your working directory.
- From the command-line, navigate into the working directory on your desktop:
alexa-skill-manage-relay-nodejs - Run the following command to pull the source code to a working directory:
git clone https://github.com/xreef/alexa-skill-manage-relay-nodejs.git
Get the Source Code via Download
If you do not have git installed, download and unzip the zipped contents of the sample from
https://github.com/xreef/alexa-skill-manage-relay-nodejs/archive/refs/heads/main.zip
into your desktop working directory: alexa-skill-manage-relay-nodejs.
Thanks
- AWS IoT core and MQTT services: introduction and prerequisite
- AWS IoT core and MQTT services: creating AWS thing with certificate and policy
- AWS IoT core and MQTT services: connect esp8266 devices
- AWS IoT core and MQTT services: connect esp32 devices
- AWS IoT core and MQTT services: connect Arduino SAMD (WiFiNINA) devices
- AWS IoT core and MQTT services: test with console and MQTT.fx