AWS Alexa Smart Home Skill: configure lambda for the skill – 4
In this article we are going to connect our Skill to the Lambda.
Configure the Smart Home settings
- Return to the Alexa Skills Kit Developer Console at https://developer.amazon.com/alexa/console/ask and open your
skill-esp8266-nodejs-smarthome-switch. - On the SMART HOME tab, leave the Payload version at v3.
- For the Smart Home service endpoint, enter the ARN saved in your
setup.txtfile as [AWS Lambda ARN] into the Default endpoint field. The ARN should look something like:arn:aws:lambda:eu-west-1:XXXXXXXXXXXX:function:lambda-skill-esp8266-nodejs-smarthome-switch - Click Save. If you get an error stating “Failed to save skill information, Please make sure that “Alexa Smart Home” is selected for the event source type…” return to your AWS Lambda for the skill-esp8266-nodejs-smarthome-switch function and verify you correctly set and saved the Smart Home trigger.
Configure the Account Linking settings
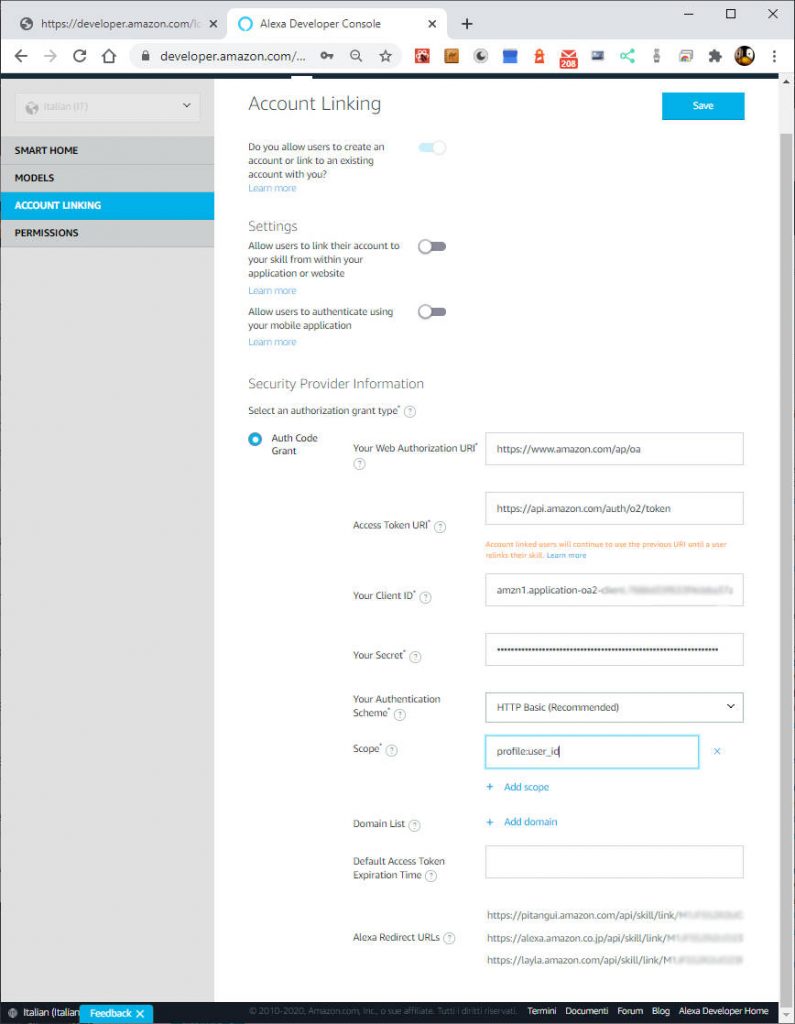
- Either select the *ACCOUNT LINKING *tab on the left or the Setup Account Linking button at the bottom of the page.
- On the Account Linking page, for the Authorization URI, enter
https://www.amazon.com/ap/oa. - For the Access Token URI, enter
https://api.amazon.com/auth/o2/token. - For the Client ID, copy and paste the previously saved [Login with Amazon Client ID] value from the
setup.txtfile. - For the Client Secret, copy and paste the previously saved [Login with Amazon Client Secret] value from the
setup.txtfile. - Under Scope, click the + Add scope link and then add the following scope into the text box:
profile:user_id - Copy the three (3) redirect urls from the Redirect URLs section and save them to the [Redirect URLs] section of the
setup.txtfile. - Click Save.
Set the Allowed Return URLs
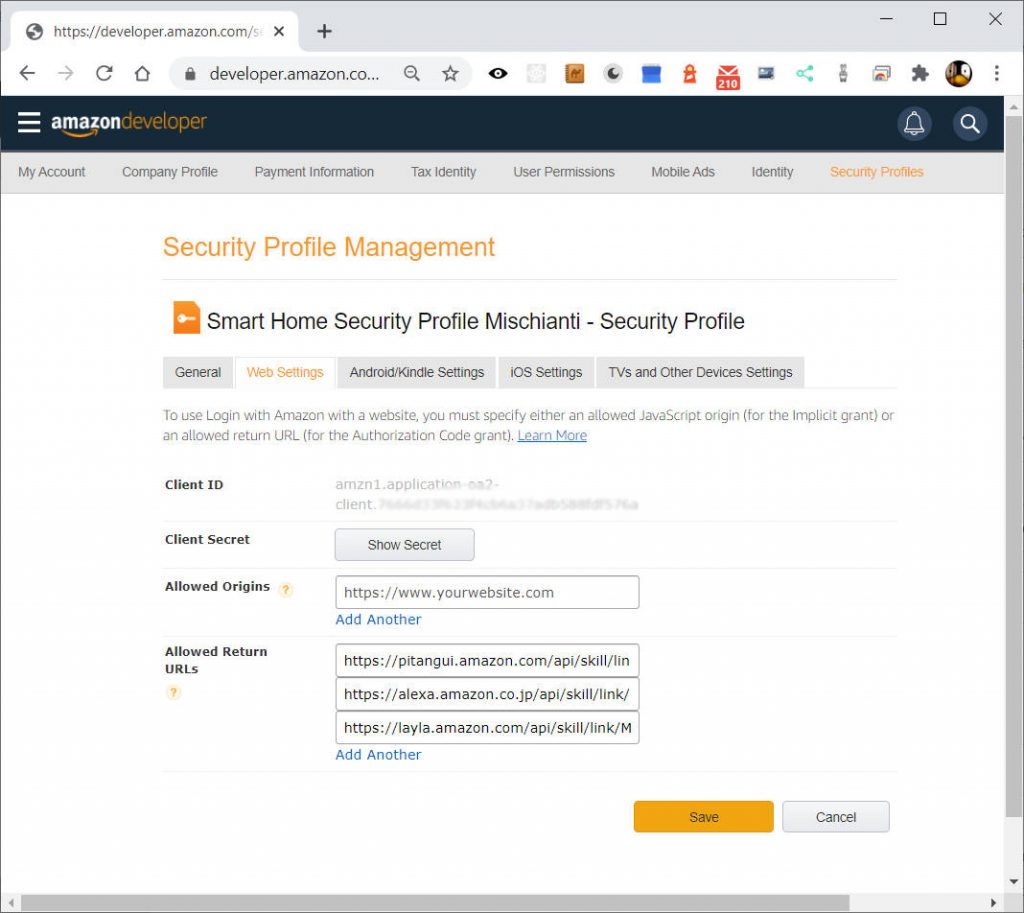
Using your account-specific values from the skill configuration section, collect the Redirect URLs and set them in the Security Profile Web Settings Allowed Return URLs.
- Open https://developer.amazon.com/iba-sp/overview.html in another browser tab and make sure Settings is selected in the top menu and Security Profiles is selected in the sub menu.
- Select the Smart Home Security Profile Mischianti Security Profile.
- On the Security Profile Management page, select the Web Settings/Gestione Web tab.
- In the Web Settings, click the Edit button.
- In the Allowed Return URLs text input, add each of the saved Redirect URLs from the
setup.txtfile. You will need to click the Add Another link to add each Return/Redirect URL. Each of the Return/Redirect URLs will have a format similar tohttps://pitangui.amazon.com/api/skill/link/XXXXXXXXXXXXXX - Click Save.
Thanks
- AWS Alexa Smart Home Skill: introduction and startup
- AWS Alexa Smart Home Skill: create the skill manage the security
- AWS Alexa Smart Home Skill: create lambda and manage security
- AWS Alexa Smart Home Skill: configure lambda for the skill
- AWS Alexa Smart Home Skill: setup the DynamoDB database
- AWS Alexa Smart Home Skill: load sample code and test Lambda
- AWS Alexa Smart Home Skill: test your skill in dev and manage log