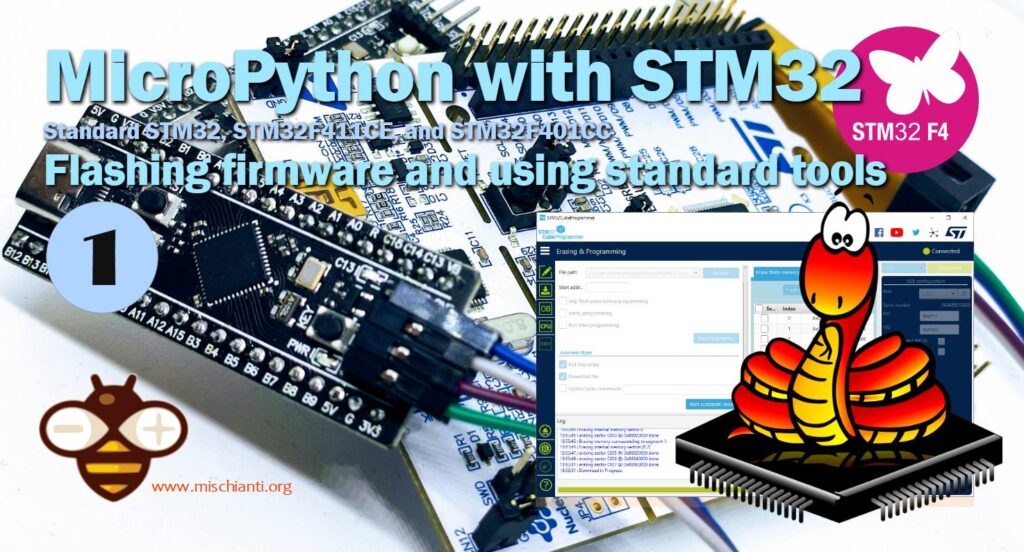
MicroPython on Nucleo STM32, STM32F411CE, and STM32F401CC: flashing firmware and basic tools
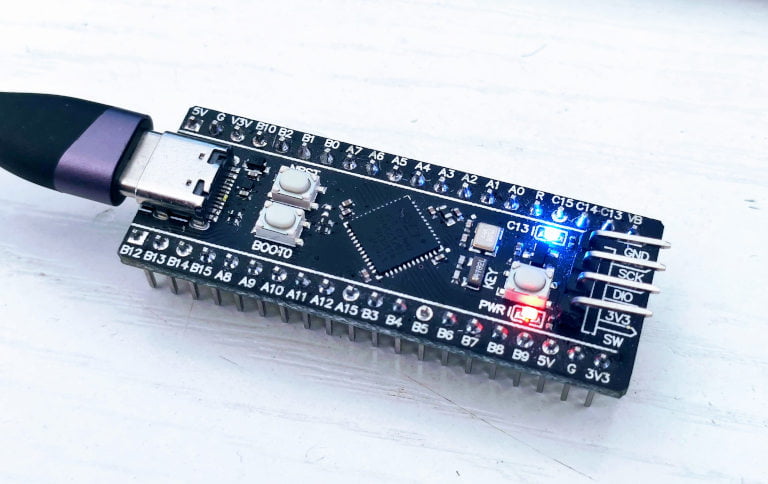
Microcontrollers have long served as the heart of numerous embedded systems. Over the years, programming these devices has shifted from low-level languages like Assembly or C to more accessible, high-level languages like Python. One prime example is MicroPython, a lean and efficient implementation of Python 3. This article delves into the details of integrating MicroPython with the STM32F4 (with a little focus on the WeAct STM32F411CE, STM32F401CC, and Nucleo board), a low-cost, high-potential microcontroller produced by STMicroelectronics.
The WeAct STM32F411CE and STM32F401CC hold an array of attractive features suitable for many IoT and embedded system applications. However, to harness this potential, you need to understand the ins and outs of flashing firmware, setting up the programming environment, and getting started with standard tools.
This comprehensive guide is intended to walk you through the step-by-step process of setting up MicroPython on the STM32F411CE and STM32F401CC. We will draw from credible resources, including a firmware building procedure available on the WeAct Studio’s GitHub repository and further device specifications from WeAct Studio’s MiniSTM32F4x1 repository.
Whether you’re a hobbyist, an academic, or a professional developer, the following exploration promises a clearer understanding of this resourceful combination – STM32F4 and MicroPython. Prepare to unlock a world of opportunities and bring your creative projects to life with this powerful yet cost-effective duo.
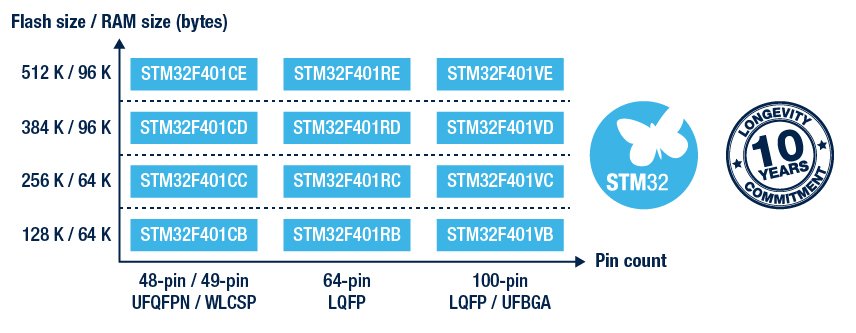
Device specification
STM32F411
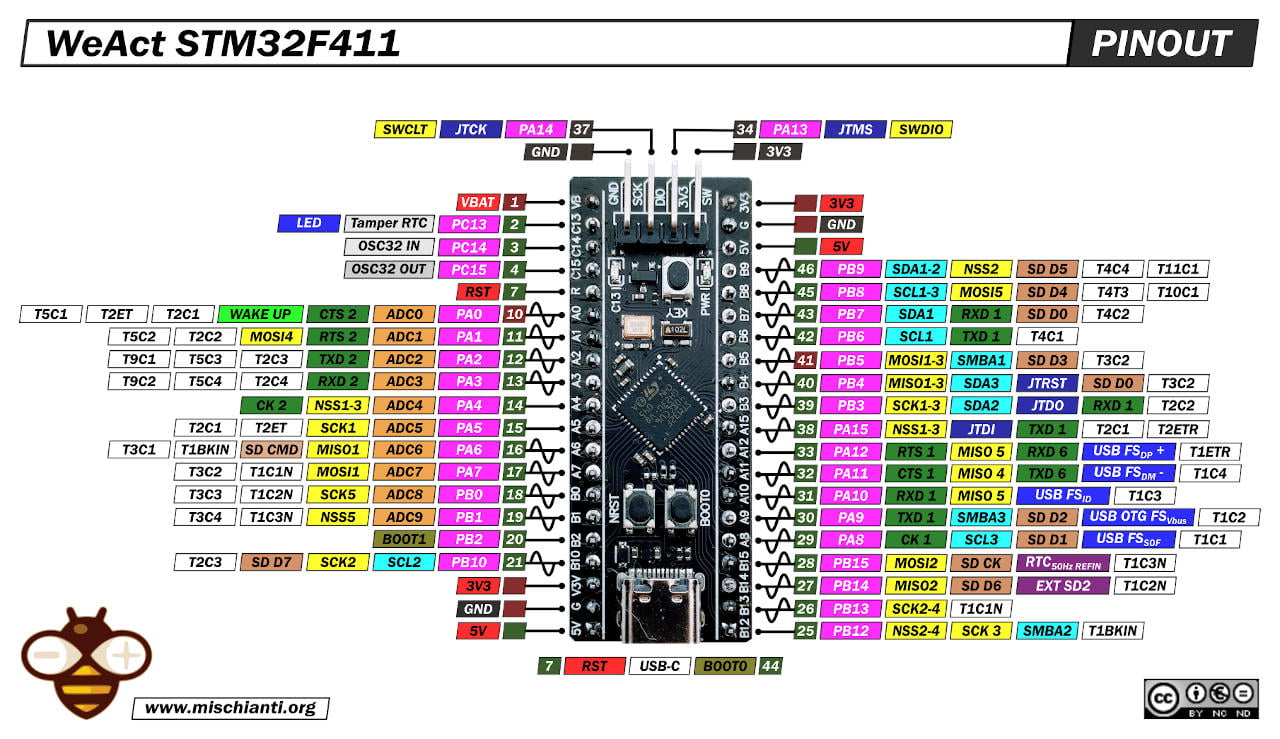
Link to the high resolution pinout image
Here the most used STM32 boards STM32F103C8T6 STM32F401 STM32F411 ST-Link v2 ST-Link v2 official
Description
The STM32F411xC/xE devices are based on the high-performance Arm® Cortex® -M4 32-bit RISC core operating at a frequency of up to 100 MHz. The Cortex®-M4 core features a Floating point unit (FPU) single precision which supports all Arm single-precision data-processing instructions and data types. It also implements a full set of DSP instructions and a memory protection unit (MPU) which enhances application security. The STM32F411xC/xE belongs to the STM32 Dynamic Efficiency™ product line (with products combining power efficiency, performance and integration) while adding a new innovative feature called Batch Acquisition Mode (BAM) allowing to save even more power consumption during data batching.
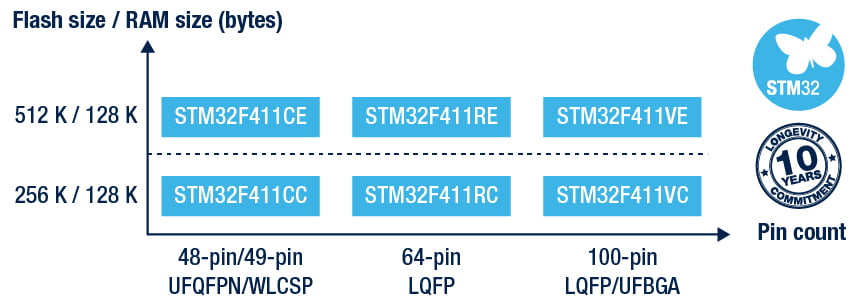
The STM32F411xC/xE incorporate high-speed embedded memories (up to 512 Kbytes of Flash memory, 128 Kbytes of SRAM), and an extensive range of enhanced I/Os and peripherals connected to two APB buses, two AHB bus and a 32-bit multi-AHB bus matrix.
All devices offer one 12-bit ADC, a low-power RTC, six general-purpose 16-bit timers including one PWM timer for motor control, two general-purpose 32-bit timers. They also feature standard and advanced communication interfaces.
The STM32F411xC/xE operate in the – 40 to + 125 °C temperature range from a 1.7 (PDR OFF) to 3.6 V power supply. A comprehensive set of power-saving mode allows the design of low-power applications.
These features make the STM32F411xC/xE microcontrollers suitable for a wide range of applications. (from ST)
Pay attention in the STM32411 series the pins 10 and 41 aren’t 5v tolerant (red square in the pinout diagram)
This board type offers a socket to the bottom to add and External SPI Flash, and SPI1 CS/SCK/MISO/MOSI (PA4/PA5/PA6/PA7) are Routed to footprint for external flash.
STM32F401
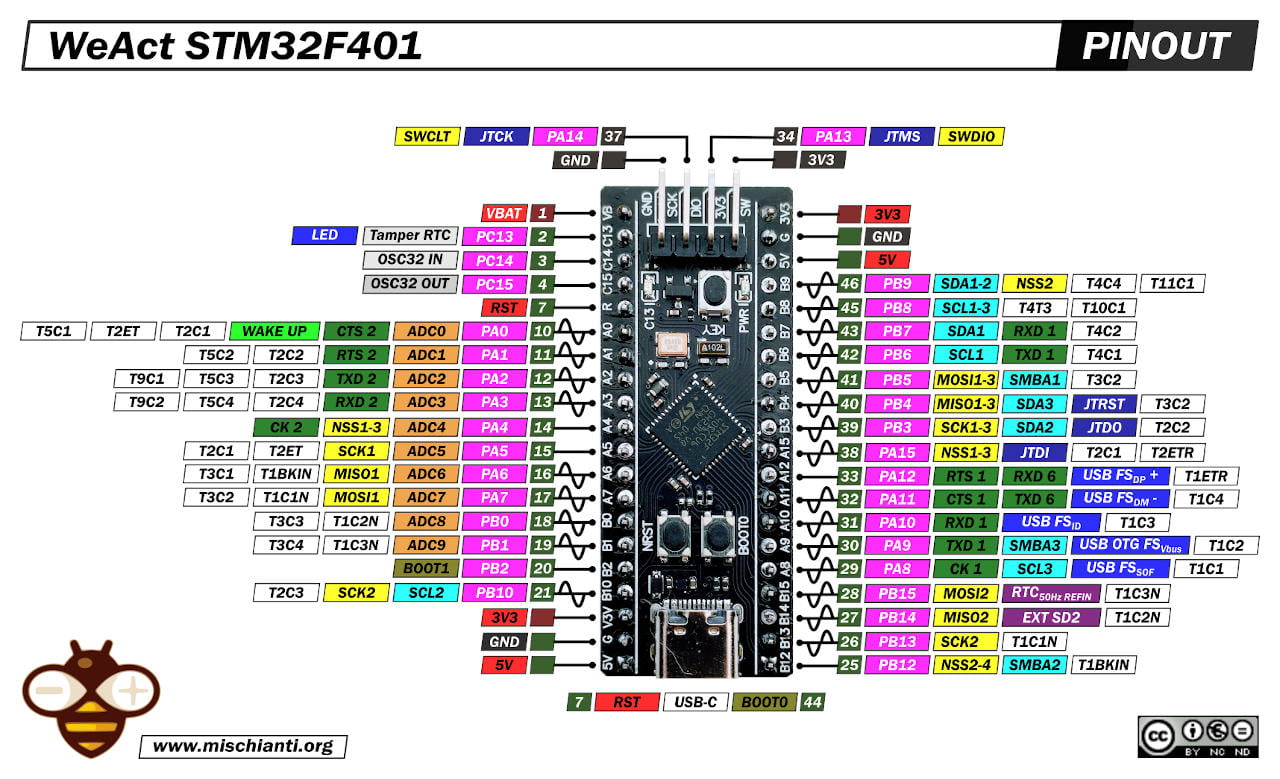
Link to the high resolution pinout image
Here the most used STM32 boards STM32F103C8T6 STM32F401 STM32F411 ST-Link v2 ST-Link v2 official
Description
The STM32F401xB/STM32F401xC devices are based on the high-performance Arm® Cortex® -M4 32-bit RISC core operating at a frequency of up to 84 MHz. The Cortex®-M4 core features a Floating point unit (FPU) single precision which supports all Arm single-precision data-processing instructions and data types. It also implements a full set of DSP instructions and a memory protection unit (MPU) which enhances application security. The STM32F401xB/STM32F401xC incorporate high-speed embedded memories, and an extensive range of enhanced I/Os and peripherals connected to two APB buses, two AHB buses and a 32-bit multi-AHB bus matrix.
All devices offer one 12-bit ADC, a low-power RTC, six general-purpose 16-bit timers including one PWM timer for motor control, two general-purpose 32-bit timers. They also feature standard and advanced communication interfaces.
The STM32F401xB/STM32F401xC operate in the – 40 to + 125 °C temperature range from a 1.7 (PDR OFF) to 3.6 V power supply. A comprehensive set of power-saving mode allows the design of low-power applications.
These features make the STM32F401xB/STM32F401xC microcontrollers suitable for a wide range of applications. (from ST)
All STM32401 have pins 5v tolerant (green square in the pinout diagram)
This board type offers a socket to the bottom to add an External SPI Flash, and SPI1 CS/SCK/MISO/MOSI (PA4/PA5/PA6/PA7) are Routed to the footprint for external flash.
MicroPython firmware
Some boards are officially supported, and the firmware is distributed directly from MicroPython. For the board I usually use, we are going to build the firmware.
Standard NUCLEO and supported board
For the standard supported board, you can download the firmware from here stm32f0, stm32f4, stm32f7, stm32g0, stm32g4, stm32h7, stm32l0, stm32l1, stm32l4, stm32wb, stm32wl.
WeAct
MicroPython firmware for STM32F411CE and STM32F401CCU6
Build the firmware
Need Ubuntu or Win10 subsystem Linux
First of all, you need git on your Linux distribution, and when you solve this prerequisite, you can download the MicroPython implementation.
git clone https://github.com/micropython/micropython.git
Here is the process
reef@PORTATIREEF:/mnt/c/Users/renzo$ git clone https://github.com/micropython/micropython.git
Cloning into 'micropython'...
remote: Enumerating objects: 108701, done.
remote: Counting objects: 100% (35946/35946), done.
remote: Compressing objects: 100% (3332/3332), done.
remote: Total 108701 (delta 34271), reused 32639 (delta 32614), pack-reused 72755
Receiving objects: 100% (108701/108701), 55.52 MiB | 2.20 MiB/s, done.
Resolving deltas: 100% (81403/81403), done.
Checking out files: 100% (5153/5153), done.
Now you need the submodule.
cd micropython
git submodule update --init
Wait a while.
reef@PORTATIREEF:/mnt/c/Users/renzo$ cd micropython
reef@PORTATIREEF:/mnt/c/Users/renzo/micropython$ git submodule update --init
Submodule 'lib/asf4' (https://github.com/adafruit/asf4) registered for path 'lib/asf4'
Submodule 'lib/axtls' (https://github.com/micropython/axtls.git) registered for path 'lib/axtls'
Submodule 'lib/berkeley-db-1.xx' (https://github.com/pfalcon/berkeley-db-1.xx) registered for path 'lib/berkeley-db-1.xx'
Submodule 'lib/btstack' (https://github.com/bluekitchen/btstack.git) registered for path 'lib/btstack'
Submodule 'lib/cyw43-driver' (https://github.com/georgerobotics/cyw43-driver.git) registered for path 'lib/cyw43-driver'
Submodule 'lib/fsp' (https://github.com/renesas/fsp.git) registered for path 'lib/fsp'
Submodule 'lib/libffi' (https://github.com/atgreen/libffi) registered for path 'lib/libffi'
Submodule 'lib/libhydrogen' (https://github.com/jedisct1/libhydrogen.git) registered for path 'lib/libhydrogen'
Submodule 'lib/lwip' (https://github.com/lwip-tcpip/lwip.git) registered for path 'lib/lwip'
Submodule 'lib/mbedtls' (https://github.com/ARMmbed/mbedtls.git) registered for path 'lib/mbedtls'
Submodule 'lib/micropython-lib' (https://github.com/micropython/micropython-lib.git) registered for path 'lib/micropython-lib'
Submodule 'lib/mynewt-nimble' (https://github.com/micropython/mynewt-nimble.git) registered for path 'lib/mynewt-nimble'
Submodule 'lib/nrfx' (https://github.com/NordicSemiconductor/nrfx.git) registered for path 'lib/nrfx'
Submodule 'lib/nxp_driver' (https://github.com/hathach/nxp_driver.git) registered for path 'lib/nxp_driver'
Submodule 'lib/pico-sdk' (https://github.com/raspberrypi/pico-sdk.git) registered for path 'lib/pico-sdk'
Submodule 'lib/stm32lib' (https://github.com/micropython/stm32lib) registered for path 'lib/stm32lib'
Submodule 'lib/tinyusb' (https://github.com/hathach/tinyusb) registered for path 'lib/tinyusb'
Submodule 'lib/wiznet' (https://github.com/andrewleech/wiznet_ioLibrary_Driver.git) registered for path 'lib/wiznet5k'
Cloning into '/mnt/c/Users/renzo/micropython/lib/asf4'...
fatal: unable to access 'https://github.com/adafruit/asf4/': Failed to connect to github.com port 443: Connection refused
fatal: clone of 'https://github.com/adafruit/asf4' into submodule path '/mnt/c/Users/renzo/micropython/lib/asf4' failed
Failed to clone 'lib/asf4'. Retry scheduled
Cloning into '/mnt/c/Users/renzo/micropython/lib/axtls'...
Cloning into '/mnt/c/Users/renzo/micropython/lib/berkeley-db-1.xx'...
Cloning into '/mnt/c/Users/renzo/micropython/lib/btstack'...
Cloning into '/mnt/c/Users/renzo/micropython/lib/cyw43-driver'...
Cloning into '/mnt/c/Users/renzo/micropython/lib/fsp'...
Cloning into '/mnt/c/Users/renzo/micropython/lib/libffi'...
Cloning into '/mnt/c/Users/renzo/micropython/lib/libhydrogen'...
Cloning into '/mnt/c/Users/renzo/micropython/lib/lwip'...
Cloning into '/mnt/c/Users/renzo/micropython/lib/mbedtls'...
Cloning into '/mnt/c/Users/renzo/micropython/lib/micropython-lib'...
Cloning into '/mnt/c/Users/renzo/micropython/lib/mynewt-nimble'...
Cloning into '/mnt/c/Users/renzo/micropython/lib/nrfx'...
Cloning into '/mnt/c/Users/renzo/micropython/lib/nxp_driver'...
Cloning into '/mnt/c/Users/renzo/micropython/lib/pico-sdk'...
Cloning into '/mnt/c/Users/renzo/micropython/lib/stm32lib'...
Cloning into '/mnt/c/Users/renzo/micropython/lib/tinyusb'...
Cloning into '/mnt/c/Users/renzo/micropython/lib/wiznet5k'...
Cloning into '/mnt/c/Users/renzo/micropython/lib/asf4'...
Submodule path 'lib/asf4': checked out '84f56af13292d8f32c40acbd949bde698ddd4507'
Submodule path 'lib/axtls': checked out '531cab9c278c947d268bd4c94ecab9153a961b43'
Submodule path 'lib/berkeley-db-1.xx': checked out '35aaec4418ad78628a3b935885dd189d41ce779b'
Submodule path 'lib/btstack': checked out '1635e36d06821af8b61302509e91bfcc1ade84c4'
Submodule path 'lib/cyw43-driver': checked out '36144f94bee69ad5e7b46fef06ce0c2405bafee5'
Submodule path 'lib/fsp': checked out 'e78939d32d1ccea9f0ba8bb42c51aceffd386b9b'
Submodule path 'lib/libffi': checked out 'e9de7e35f2339598b16cbb375f9992643ed81209'
Submodule path 'lib/libhydrogen': checked out '5c5d513093075f7245ea522101b17c50aa579af2'
Submodule path 'lib/lwip': checked out '6ca936f6b588cee702c638eee75c2436e6cf75de'
Submodule path 'lib/mbedtls': checked out '981743de6fcdbe672e482b6fd724d31d0a0d2476'
Submodule path 'lib/micropython-lib': checked out 'c113611765278b2fc8dcf8b2f2c3513b35a69b39'
Submodule path 'lib/mynewt-nimble': checked out '42849560ba7906f023f61e5f7ff3709ba2c1dfca'
Submodule path 'lib/nrfx': checked out '7a4c9d946cf1801771fc180acdbf7b878f270093'
Submodule path 'lib/nxp_driver': checked out 'fa5a554c7944d2a196626f8d3631e44943f9abcc'
Submodule path 'lib/pico-sdk': checked out 'f396d05f8252d4670d4ea05c8b7ac938ef0cd381'
Submodule path 'lib/stm32lib': checked out 'fdb1ec6879bc8b7bb54ded73bac04839003c5a07'
Submodule path 'lib/tinyusb': checked out '868f2bcda092b0b8d5f7ac55ffaef2c81316d35e'
Submodule path 'lib/wiznet5k': checked out '0803fc519ad7227e841287fb3638d6c8b2f111a1'
Submodule path 'lib/asf4': checked out '84f56af13292d8f32c40acbd949bde698ddd4507'
reef@PORTATIREEF:/mnt/c/Users/renzo/micropython$
Now make mpy-cross
cd mpy-cross
make -j4
And here is the result
reef@PORTATIREEF:/mnt/c/Users/renzo/micropython/mpy-cross$ make -j4
Use make V=1 or set BUILD_VERBOSE in your environment to increase build verbosity.
mkdir -p build/genhdr
mkdir -p build/
mkdir -p build/py/
mkdir -p build/shared/runtime/
GEN build/genhdr/mpversion.h
GEN build/genhdr/qstr.i.last
GEN build/genhdr/qstr.split
GEN build/genhdr/moduledefs.split
GEN build/genhdr/root_pointers.split
GEN build/genhdr/moduledefs.collected
GEN build/genhdr/root_pointers.collected
Root pointer registrations updated
Module registrations updated
GEN build/genhdr/root_pointers.h
GEN build/genhdr/moduledefs.h
GEN build/genhdr/qstrdefs.collected.h
QSTR updated
GEN build/genhdr/qstrdefs.generated.h
CC ../py/mpstate.c
CC ../py/nlr.c
CC ../py/nlrx86.c
CC ../py/nlrx64.c
CC ../py/nlrthumb.c
CC ../py/nlraarch64.c
CC ../py/nlrmips.c
CC ../py/nlrpowerpc.c
CC ../py/nlrxtensa.c
CC ../py/nlrsetjmp.c
CC ../py/malloc.c
CC ../py/gc.c
CC ../py/pystack.c
CC ../py/qstr.c
CC ../py/vstr.c
CC ../py/mpprint.c
CC ../py/unicode.c
CC ../py/mpz.c
CC ../py/reader.c
CC ../py/lexer.c
CC ../py/parse.c
CC ../py/scope.c
CC ../py/compile.c
CC ../py/emitcommon.c
CC ../py/emitbc.c
CC ../py/asmbase.c
CC ../py/asmx64.c
CC ../py/emitnx64.c
CC ../py/asmx86.c
CC ../py/emitnx86.c
CC ../py/asmthumb.c
CC ../py/emitnthumb.c
CC ../py/emitinlinethumb.c
CC ../py/asmarm.c
CC ../py/emitnarm.c
CC ../py/asmxtensa.c
CC ../py/emitnxtensa.c
CC ../py/emitinlinextensa.c
CC ../py/emitnxtensawin.c
CC ../py/formatfloat.c
CC ../py/parsenumbase.c
CC ../py/parsenum.c
CC ../py/emitglue.c
CC ../py/persistentcode.c
CC ../py/runtime.c
CC ../py/runtime_utils.c
CC ../py/scheduler.c
CC ../py/nativeglue.c
CC ../py/pairheap.c
CC ../py/ringbuf.c
CC ../py/stackctrl.c
CC ../py/argcheck.c
CC ../py/warning.c
CC ../py/profile.c
CC ../py/map.c
CC ../py/obj.c
CC ../py/objarray.c
CC ../py/objattrtuple.c
CC ../py/objbool.c
CC ../py/objboundmeth.c
CC ../py/objcell.c
CC ../py/objclosure.c
CC ../py/objcomplex.c
CC ../py/objdeque.c
CC ../py/objdict.c
CC ../py/objenumerate.c
CC ../py/objexcept.c
CC ../py/objfilter.c
CC ../py/objfloat.c
CC ../py/objfun.c
CC ../py/objgenerator.c
CC ../py/objgetitemiter.c
CC ../py/objint.c
CC ../py/objint_longlong.c
CC ../py/objint_mpz.c
CC ../py/objlist.c
CC ../py/objmap.c
CC ../py/objmodule.c
CC ../py/objobject.c
CC ../py/objpolyiter.c
CC ../py/objproperty.c
CC ../py/objnone.c
CC ../py/objnamedtuple.c
CC ../py/objrange.c
CC ../py/objreversed.c
CC ../py/objset.c
CC ../py/objsingleton.c
CC ../py/objslice.c
CC ../py/objstr.c
CC ../py/objstrunicode.c
CC ../py/objstringio.c
CC ../py/objtuple.c
CC ../py/objtype.c
CC ../py/objzip.c
CC ../py/opmethods.c
CC ../py/sequence.c
CC ../py/stream.c
CC ../py/binary.c
CC ../py/builtinimport.c
CC ../py/builtinevex.c
CC ../py/builtinhelp.c
CC ../py/modarray.c
CC ../py/modbuiltins.c
CC ../py/modcollections.c
CC ../py/modgc.c
CC ../py/modio.c
CC ../py/modmath.c
CC ../py/modcmath.c
CC ../py/modmicropython.c
CC ../py/modstruct.c
CC ../py/modsys.c
CC ../py/moduerrno.c
CC ../py/modthread.c
CC ../py/vm.c
CC ../py/bc.c
CC ../py/showbc.c
CC ../py/repl.c
CC ../py/smallint.c
CC ../py/frozenmod.c
CC main.c
CC gccollect.c
CC ../shared/runtime/gchelper_generic.c
LINK build/mpy-cross
   text    data     bss     dec     hex filename
 316431   13712     840  330983   50ce7 build/mpy-cross
reef@PORTATIREEF:/mnt/c/Users/renzo/micropython/mpy-cross$
Definition of STM32F411CE
Now we can download the board definition from the WeActStudio repository for the F411CE.
cd ../ports/stm32/boards
git clone https://github.com/WeActTC/WeAct_F411CE-MicroPython.git WeAct_F411CE
cd ..
Here is the result.
reef@PORTATIREEF:/mnt/c/Users/renzo/micropython/ports/stm32/boards$ git clone https://github.com/WeActTC/WeAct_F411CE-MicroPython.git WeAct_F411CE
Cloning into 'WeAct_F411CE'...
remote: Enumerating objects: 64, done.
remote: Counting objects: 100% (64/64), done.
remote: Compressing objects: 100% (41/41), done.
remote: Total 64 (delta 34), reused 50 (delta 21), pack-reused 0
Unpacking objects: 100% (64/64), done.
reef@PORTATIREEF:/mnt/c/Users/renzo/micropython/ports/stm32/boards$ cd ..
reef@PORTATIREEF:/mnt/c/Users/renzo/micropython/ports/stm32$
Or download my repository for F411CE and copy the folder WeAct_F411CE inside the boards’ definition of MicroPython.
\micropython\ports\stm32\boards
Definition of STM32F401CCU6
Or download my repository for F401CC and copy the folder WeAct_F411CE inside the boards’ definition of MicroPython.
\micropython\ports\stm32\boards
Personalize configuration
mpconfigboard.h
/* BOARD Ver 2.0 set 1 ,other set 0 ex.V1.3,V2.1 V3.0 */
#define VERSION_V20 (1)

/* Use the built-in flash to change to 1 , use the external flash to change to 0 */
#define MICROPY_HW_ENABLE_INTERNAL_FLASH_STORAGE (1)

// Flash Size:
// 4MB Flash 32Mbit
// 8MB Flash 64Mbit
// 16MB Flash 128Mbit
#define MICROPY_HW_SPIFLASH_SIZE_BITS (32 * 1024 * 1024)
SPI FLASH:
#define MICROPY_HW_SPIFLASH_CS      (pin_A4)
#define MICROPY_HW_SPIFLASH_SCK     (pin_A5)
#if VERSION_V20
 #define MICROPY_HW_SPIFLASH_MISO    (pin_B4)
#else
 #define MICROPY_HW_SPIFLASH_MISO    (pin_A6)
#endif
 #define MICROPY_HW_SPIFLASH_MOSI    (pin_A7)
Build the firmware
Now you can try to build the firmware with this command for F411CE
make BOARD=WeAct_F411CE -j
or this for F401CC
make BOARD=WeAct_F401CC -j
But if you try to build without gcc-arm-none-eabi to obtain this error
reef@PORTATIREEF:/mnt/c/Users/renzo/micropython/ports/stm32$ make BOARD=WeAct_F411CE -j
Use make V=1 or set BUILD_VERBOSE in your environment to increase build verbosity.
mkdir -p build-WeAct_F411CE/genhdr
mkdir -p build-WeAct_F411CE/boards/WeAct_F411CE/
mkdir -p build-WeAct_F411CE/build-WeAct_F411CE/
mkdir -p build-WeAct_F411CE/drivers/bus/
mkdir -p build-WeAct_F411CE/drivers/dht/
mkdir -p build-WeAct_F411CE/drivers/memory/
mkdir -p build-WeAct_F411CE/extmod/
mkdir -p build-WeAct_F411CE/lib/libm/
mkdir -p build-WeAct_F411CE/lib/littlefs/
mkdir -p build-WeAct_F411CE/lib/oofatfs/
mkdir -p build-WeAct_F411CE/lib/stm32lib/CMSIS/STM32F4xx/Source/Templates/
mkdir -p build-WeAct_F411CE/lib/stm32lib/CMSIS/STM32F4xx/Source/Templates/gcc/
mkdir -p build-WeAct_F411CE/lib/stm32lib/STM32F4xx_HAL_Driver/Src/
mkdir -p build-WeAct_F411CE/py/
mkdir -p build-WeAct_F411CE/shared/libc/
mkdir -p build-WeAct_F411CE/shared/netutils/
mkdir -p build-WeAct_F411CE/shared/readline/
mkdir -p build-WeAct_F411CE/shared/runtime/
mkdir -p build-WeAct_F411CE/shared/timeutils/
mkdir -p build-WeAct_F411CE/usbdev/class/src/
mkdir -p build-WeAct_F411CE/usbdev/core/src/
GEN stmconst build-WeAct_F411CE/genhdr/modstm_const.h
GEN build-WeAct_F411CE/pins_WeAct_F411CE.c
GEN build-WeAct_F411CE/genhdr/pybcdc.inf
GEN build-WeAct_F411CE/genhdr/pllfreqtable.h
GEN build-WeAct_F411CE/genhdr/pybcdc_inf.h
GEN build-WeAct_F411CE/genhdr/mpversion.h
GEN build-WeAct_F411CE/genhdr/qstr.i.last
Traceback (most recent call last):
  File "../../py/makeqstrdefs.py", line 209, in <module>
    preprocess()
  File "../../py/makeqstrdefs.py", line 76, in preprocess
    for output in p.imap(pp(flags), chunks):
  File "/usr/lib/python3.6/multiprocessing/pool.py", line 735, in next
    raise value
  File "/usr/lib/python3.6/multiprocessing/pool.py", line 119, in worker
    result = (True, func(*args, **kwds))
  File "../../py/makeqstrdefs.py", line 60, in run
    return subprocess.check_output(args.pp + flags + files)
  File "/usr/lib/python3.6/subprocess.py", line 356, in check_output
    **kwargs).stdout
  File "/usr/lib/python3.6/subprocess.py", line 423, in run
    with Popen(*popenargs, **kwargs) as process:
  File "/usr/lib/python3.6/subprocess.py", line 729, in __init__
    restore_signals, start_new_session)
  File "/usr/lib/python3.6/subprocess.py", line 1364, in _execute_child
    raise child_exception_type(errno_num, err_msg, err_filename)
FileNotFoundError: [Errno 2] No such file or directory: 'arm-none-eabi-gcc': 'arm-none-eabi-gcc'
../../py/mkrules.mk:110: recipe for target 'build-WeAct_F411CE/genhdr/qstr.i.last' failed
make: *** [build-WeAct_F411CE/genhdr/qstr.i.last] Error 1
make: *** Deleting file 'build-WeAct_F411CE/genhdr/qstr.i.last'
Now download It with the default package manager, or download then give the pat to the compiler with this command.
make BOARD=WeAct_F411CE CROSS_COMPILE=/mnt/e/MCU/tools/gcc-arm-none-eabi-8-2018-q4-major/bin/arm-none-eabi- -j
After the build, you can find the firmware in this folder.
PATH micropython\ports\stm32\build-WeAct_F411CE\firmware.hex
Download pre-compiled firmware
I compile the firmware, and I upload It to these repositories.
Upload firmware
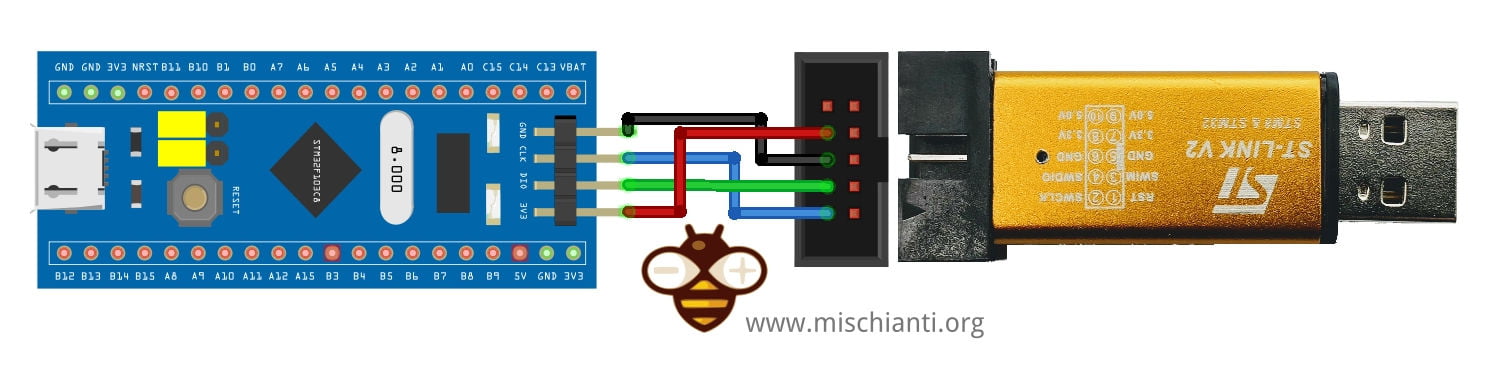
For the original STM32, you don’t need more than the USB cable. It already integrates ST-Link.
ST-Link drivers
Download and install the st-link drivers from here.
Once installed, you can connect the ST eval board to your computer with a mini-USB cable.
Program the STM32 with ST-LINK tools
Download and unzip the binary release of the st-link tools from GitHub
Save the hex file in the same directory you unzipped the st-link binaries.
Open a command prompt and navigate to the st-link folder and run the following commands:
st-flash.exe erase
Here the output
D:\program\st-link\stlink-1.7.0-x86_64-w64-mingw32\bin>st-flash.exe erase
st-flash 1.7.0
2023-05-21T09:14:08 INFO common.c: stm32f411re: 128 KiB SRAM, 512 KiB flash in at least 16 KiB pages.
Mass erasing.....

D:\program\st-link\stlink-1.7.0-x86_64-w64-mingw32\bin>
Now we start to upload the MicroPython firmware.
st-flash.exe --format ihex write firmware.hex
Here is the result.
D:\program\st-link\stlink-1.7.0-x86_64-w64-mingw32\bin>st-flash.exe --format ihex write firmware.hex
st-flash 1.7.0
2023-05-21T09:16:52 INFO common.c: stm32f411re: 128 KiB SRAM, 512 KiB flash in at least 16 KiB pages.
2023-05-21T09:16:52 INFO common.c: Attempting to write 449524 (0x6dbf4) bytes to stm32 address: 134217728 (0x8000000)
EraseFlash - Sector:0x0 Size:0x4000 2023-05-21T09:16:52 INFO common.c: Flash page at addr: 0x08000000 erased
EraseFlash - Sector:0x1 Size:0x4000 2023-05-21T09:16:52 INFO common.c: Flash page at addr: 0x08004000 erased
EraseFlash - Sector:0x2 Size:0x4000 2023-05-21T09:16:53 INFO common.c: Flash page at addr: 0x08008000 erased
EraseFlash - Sector:0x3 Size:0x4000 2023-05-21T09:16:53 INFO common.c: Flash page at addr: 0x0800c000 erased
EraseFlash - Sector:0x4 Size:0x10000 2023-05-21T09:16:54 INFO common.c: Flash page at addr: 0x08010000 erased
EraseFlash - Sector:0x5 Size:0x20000 2023-05-21T09:16:56 INFO common.c: Flash page at addr: 0x08020000 erased
EraseFlash - Sector:0x6 Size:0x20000 2023-05-21T09:16:58 INFO common.c: Flash page at addr: 0x08040000 erased
EraseFlash - Sector:0x7 Size:0x20000 2023-05-21T09:17:00 INFO common.c: Flash page at addr: 0x08060000 erased
2023-05-21T09:17:00 INFO common.c: Finished erasing 8 pages of 131072 (0x20000) bytes
2023-05-21T09:17:00 INFO common.c: Starting Flash write for F2/F4/F7/L4
2023-05-21T09:17:00 INFO flash_loader.c: Successfully loaded flash loader in sram
2023-05-21T09:17:00 INFO flash_loader.c: Clear DFSR
2023-05-21T09:17:00 INFO flash_loader.c: Clear CFSR
2023-05-21T09:17:00 INFO flash_loader.c: Clear HFSR
2023-05-21T09:17:00 INFO common.c: enabling 32-bit flash writes
2023-05-21T09:17:07 INFO common.c: Starting verification of write complete
2023-05-21T09:17:11 INFO common.c: Flash written and verified! jolly good!

D:\program\st-link\stlink-1.7.0-x86_64-w64-mingw32\bin>
Program the STM32 with STM32CubeProgrammer
Now to upload the firmware, you can use the STM32CubeProgrammer released from STMicroelectronics. You can download It from here.
After that, start It and select your preferred connection.
In my case,
- I put the device in program mode with:
- Hold BOOTD button
- Click NRST button
- Release BOOTD
- I select USB
- Then the refresh button
- And finally, the connection.
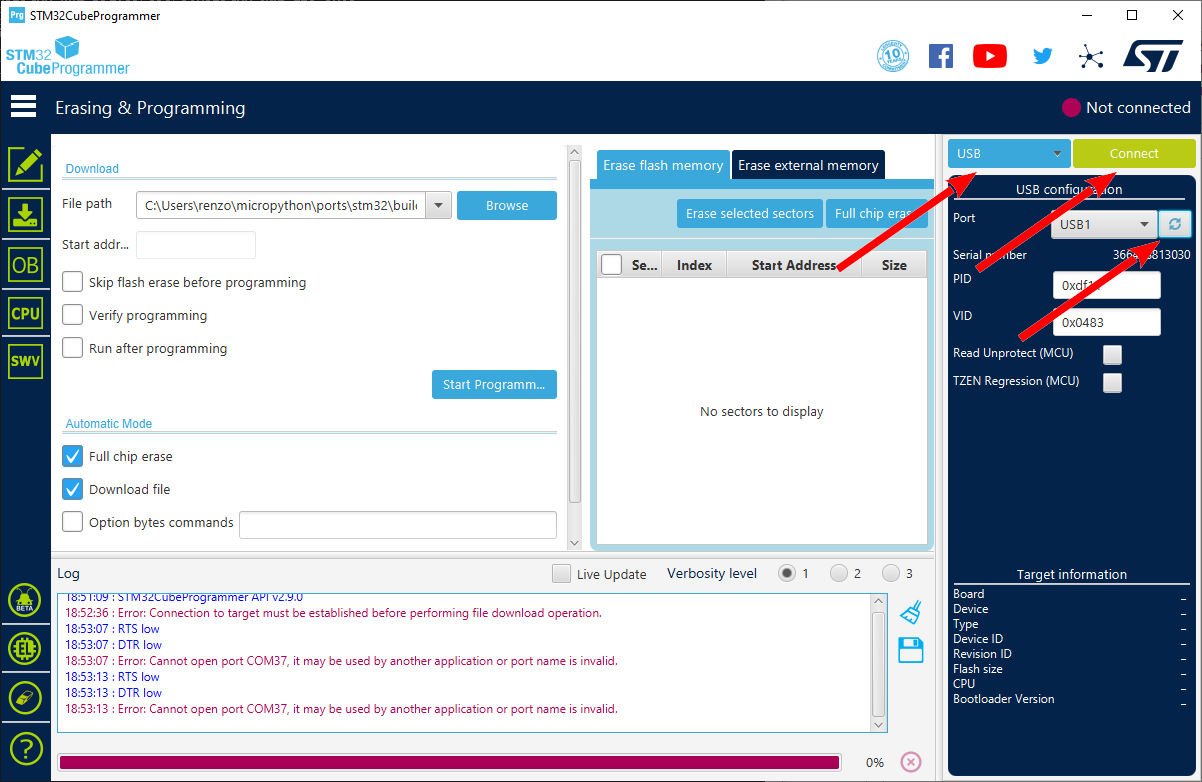
Now you can click on Start Program..
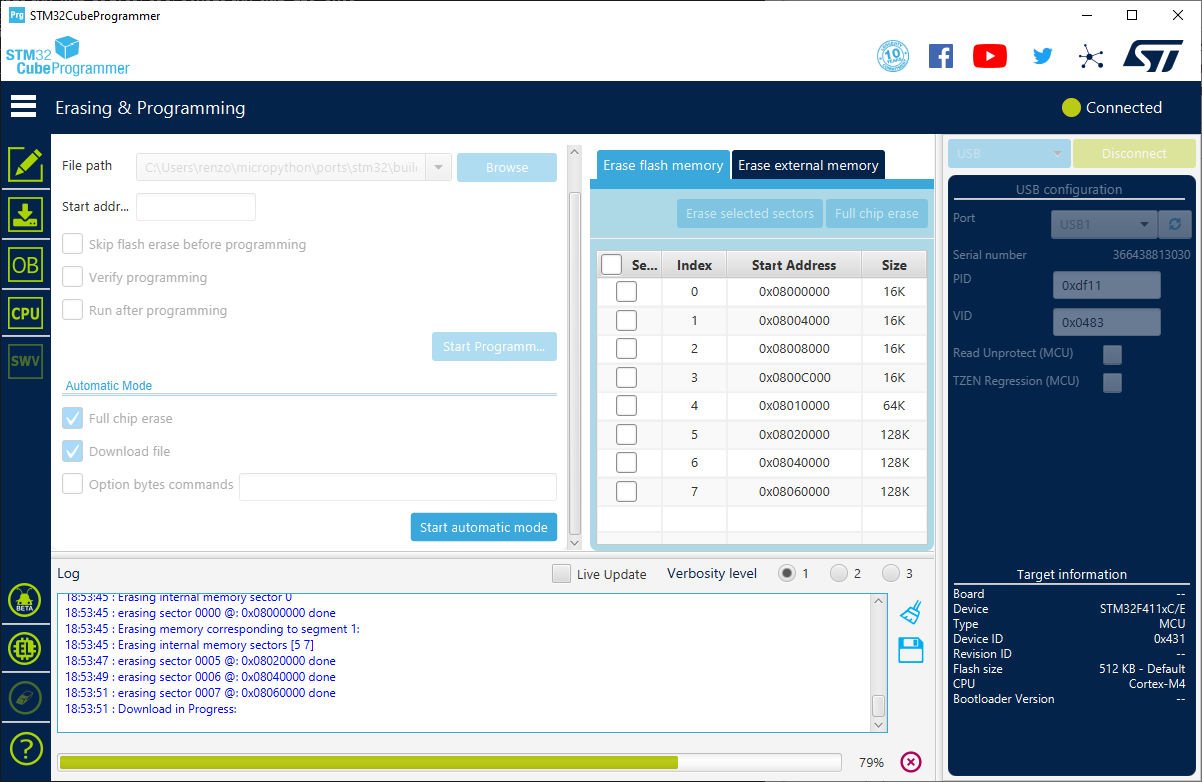
Now the firmware is active on the device.
Start programming in an interactive console (REPL)
Now we are going to program in Python immediately. To do so, we can use a Serial monitor to connect to the interactive console of the device.
Use a serial monitor to view the output of your MicroPython code. There are several options for serial monitors, including:
screen(macOS/Linux): Open a terminal and run the following command, replacing/dev/ttyUSB0with the correct serial port of your board:
screen COM5 115200
- PuTTY (Windows): Download and install PuTTY from the official website (https://www.chiark.greenend.org.uk/~sgtatham/putty/latest.html), then open PuTTY and configure it to use the correct serial port and baud rate (usually 115200).
- CoolTerm (macOS/Windows): Download and install CoolTerm from the official website, then open CoolTerm and configure it to use the correct serial port and baud rate (usually 115200).
Writing and running Python code with an interactive session
Once you have MicroPython installed on your board, you can use the REPL (Read-Eval-Print Loop) to interact with the board and run Python code. The REPL is a simple way to enter Python commands and see their output in real-time. You can connect to the board’s REPL using a serial terminal program, like PuTTY or screen, over a USB connection.
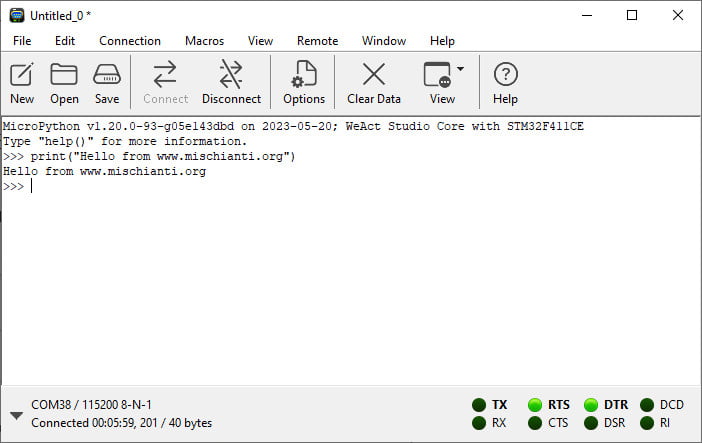
To enter the REPL on an STM32 board, open a serial terminal program and connect to the board’s serial port at a baud rate of 115200. You should see a prompt like this:
MicroPython v1.20.0-93-g05e143dbd on 2023-05-20; WeAct Studio Core with STM32F411CE
Type "help()" for more information.
>>>
This is the Python prompt, where you can enter Python commands. For example, you can enter the following command to print “Hello, world!” to the console:
>>> print("Hello from www.mischianti.org")
You should see the following output:
Hello from www.mischianti.org
You can also write Python code on your computer and upload it to the board using a tool like ampy or rshell. These tools allow you to transfer Python files to the board and run them from the board’s file system.
Interfacing with the board’s hardware peripherals:
MicroPython on the STM32 provide access to the board’s hardware peripherals, like GPIO pins, SPI and I2C buses, and analog inputs. You can use Python code to interact with these peripherals and build projects that interact with the physical world.
You must install the package “machine” with pip.
You probably get this error.
D:\projects\micropython\testesp>pip install machine
Defaulting to user installation because normal site-packages is not writeable
Collecting machine
  Downloading machine-0.0.1-py2.py3-none-any.whl (4.2 kB)
Collecting pycrypto
  Downloading pycrypto-2.6.1.tar.gz (446 kB)
     |████████████████████████████████| 446 kB 2.2 MB/s
Using legacy 'setup.py install' for pycrypto, since package 'wheel' is not installed.
Installing collected packages: pycrypto, machine
    Running setup.py install for pycrypto ... error
    ERROR: Command errored out with exit status 1:
     command: 'c:\program files\python39\python.exe' -u -c 'import sys, setuptools, tokenize; sys.argv[0] = '"'"'C:\\Users\\renzo\\AppData\\Local\\Temp\\pip-install-svmkdo9_\\pycrypto_ee48e2c475ff47aaa23d619983f3b5e3\\setup.py'"'"'; __file__='"'"'C:\\Users\\renzo\\AppData\\Local\\Temp\\pip-install-svmkdo9_\\pycrypto_ee48e2c475ff47aaa23d619983f3b5e3\\setup.py'"'"';f=getattr(tokenize, '"'"'open'"'"', open)(__file__);code=f.read().replace('"'"'\r\n'"'"', '"'"'\n'"'"');f.close();exec(compile(code, __file__, '"'"'exec'"'"'))' install --record 'C:\Users\renzo\AppData\Local\Temp\pip-record-qctz6vm0\install-record.txt' --single-version-externally-managed --user --prefix= --compile --install-headers 'C:\Users\renzo\AppData\Roaming\Python\Python39\Include\pycrypto'
         cwd: C:\Users\renzo\AppData\Local\Temp\pip-install-svmkdo9_\pycrypto_ee48e2c475ff47aaa23d619983f3b5e3\
    Complete output (183 lines):
    running install
    running build
    running build_py
    creating build
    creating build\lib.win-amd64-3.9
    creating build\lib.win-amd64-3.9\Crypto
    copying lib\Crypto\pct_warnings.py -> build\lib.win-amd64-3.9\Crypto
    copying lib\Crypto\__init__.py -> build\lib.win-amd64-3.9\Crypto
    creating build\lib.win-amd64-3.9\Crypto\Hash
    copying lib\Crypto\Hash\hashalgo.py -> build\lib.win-amd64-3.9\Crypto\Hash
    copying lib\Crypto\Hash\HMAC.py -> build\lib.win-amd64-3.9\Crypto\Hash
    copying lib\Crypto\Hash\MD2.py -> build\lib.win-amd64-3.9\Crypto\Hash
    copying lib\Crypto\Hash\MD4.py -> build\lib.win-amd64-3.9\Crypto\Hash
    copying lib\Crypto\Hash\MD5.py -> build\lib.win-amd64-3.9\Crypto\Hash
    copying lib\Crypto\Hash\RIPEMD.py -> build\lib.win-amd64-3.9\Crypto\Hash
    copying lib\Crypto\Hash\SHA.py -> build\lib.win-amd64-3.9\Crypto\Hash
    copying lib\Crypto\Hash\SHA224.py -> build\lib.win-amd64-3.9\Crypto\Hash
    copying lib\Crypto\Hash\SHA256.py -> build\lib.win-amd64-3.9\Crypto\Hash
    copying lib\Crypto\Hash\SHA384.py -> build\lib.win-amd64-3.9\Crypto\Hash
    copying lib\Crypto\Hash\SHA512.py -> build\lib.win-amd64-3.9\Crypto\Hash
    copying lib\Crypto\Hash\__init__.py -> build\lib.win-amd64-3.9\Crypto\Hash
    creating build\lib.win-amd64-3.9\Crypto\Cipher
    copying lib\Crypto\Cipher\AES.py -> build\lib.win-amd64-3.9\Crypto\Cipher
    copying lib\Crypto\Cipher\ARC2.py -> build\lib.win-amd64-3.9\Crypto\Cipher
    copying lib\Crypto\Cipher\ARC4.py -> build\lib.win-amd64-3.9\Crypto\Cipher
    copying lib\Crypto\Cipher\blockalgo.py -> build\lib.win-amd64-3.9\Crypto\Cipher
    copying lib\Crypto\Cipher\Blowfish.py -> build\lib.win-amd64-3.9\Crypto\Cipher
    copying lib\Crypto\Cipher\CAST.py -> build\lib.win-amd64-3.9\Crypto\Cipher
    copying lib\Crypto\Cipher\DES.py -> build\lib.win-amd64-3.9\Crypto\Cipher
    copying lib\Crypto\Cipher\DES3.py -> build\lib.win-amd64-3.9\Crypto\Cipher
    copying lib\Crypto\Cipher\PKCS1_OAEP.py -> build\lib.win-amd64-3.9\Crypto\Cipher
    copying lib\Crypto\Cipher\PKCS1_v1_5.py -> build\lib.win-amd64-3.9\Crypto\Cipher
    copying lib\Crypto\Cipher\XOR.py -> build\lib.win-amd64-3.9\Crypto\Cipher
    copying lib\Crypto\Cipher\__init__.py -> build\lib.win-amd64-3.9\Crypto\Cipher
    creating build\lib.win-amd64-3.9\Crypto\Util
    copying lib\Crypto\Util\asn1.py -> build\lib.win-amd64-3.9\Crypto\Util
    copying lib\Crypto\Util\Counter.py -> build\lib.win-amd64-3.9\Crypto\Util
    copying lib\Crypto\Util\number.py -> build\lib.win-amd64-3.9\Crypto\Util
    copying lib\Crypto\Util\py3compat.py -> build\lib.win-amd64-3.9\Crypto\Util
    copying lib\Crypto\Util\randpool.py -> build\lib.win-amd64-3.9\Crypto\Util
    copying lib\Crypto\Util\RFC1751.py -> build\lib.win-amd64-3.9\Crypto\Util
    copying lib\Crypto\Util\winrandom.py -> build\lib.win-amd64-3.9\Crypto\Util
    copying lib\Crypto\Util\_number_new.py -> build\lib.win-amd64-3.9\Crypto\Util
    copying lib\Crypto\Util\__init__.py -> build\lib.win-amd64-3.9\Crypto\Util
    creating build\lib.win-amd64-3.9\Crypto\Random
    copying lib\Crypto\Random\random.py -> build\lib.win-amd64-3.9\Crypto\Random
    copying lib\Crypto\Random\_UserFriendlyRNG.py -> build\lib.win-amd64-3.9\Crypto\Random
    copying lib\Crypto\Random\__init__.py -> build\lib.win-amd64-3.9\Crypto\Random
    creating build\lib.win-amd64-3.9\Crypto\Random\Fortuna
    copying lib\Crypto\Random\Fortuna\FortunaAccumulator.py -> build\lib.win-amd64-3.9\Crypto\Random\Fortuna
    copying lib\Crypto\Random\Fortuna\FortunaGenerator.py -> build\lib.win-amd64-3.9\Crypto\Random\Fortuna
    copying lib\Crypto\Random\Fortuna\SHAd256.py -> build\lib.win-amd64-3.9\Crypto\Random\Fortuna
    copying lib\Crypto\Random\Fortuna\__init__.py -> build\lib.win-amd64-3.9\Crypto\Random\Fortuna
    creating build\lib.win-amd64-3.9\Crypto\Random\OSRNG
    copying lib\Crypto\Random\OSRNG\fallback.py -> build\lib.win-amd64-3.9\Crypto\Random\OSRNG
    copying lib\Crypto\Random\OSRNG\nt.py -> build\lib.win-amd64-3.9\Crypto\Random\OSRNG
    copying lib\Crypto\Random\OSRNG\posix.py -> build\lib.win-amd64-3.9\Crypto\Random\OSRNG
    copying lib\Crypto\Random\OSRNG\rng_base.py -> build\lib.win-amd64-3.9\Crypto\Random\OSRNG
    copying lib\Crypto\Random\OSRNG\__init__.py -> build\lib.win-amd64-3.9\Crypto\Random\OSRNG
    creating build\lib.win-amd64-3.9\Crypto\SelfTest
    copying lib\Crypto\SelfTest\st_common.py -> build\lib.win-amd64-3.9\Crypto\SelfTest
    copying lib\Crypto\SelfTest\__init__.py -> build\lib.win-amd64-3.9\Crypto\SelfTest
    creating build\lib.win-amd64-3.9\Crypto\SelfTest\Cipher
    copying lib\Crypto\SelfTest\Cipher\common.py -> build\lib.win-amd64-3.9\Crypto\SelfTest\Cipher
    copying lib\Crypto\SelfTest\Cipher\test_AES.py -> build\lib.win-amd64-3.9\Crypto\SelfTest\Cipher
    copying lib\Crypto\SelfTest\Cipher\test_ARC2.py -> build\lib.win-amd64-3.9\Crypto\SelfTest\Cipher
    copying lib\Crypto\SelfTest\Cipher\test_ARC4.py -> build\lib.win-amd64-3.9\Crypto\SelfTest\Cipher
    copying lib\Crypto\SelfTest\Cipher\test_Blowfish.py -> build\lib.win-amd64-3.9\Crypto\SelfTest\Cipher
    copying lib\Crypto\SelfTest\Cipher\test_CAST.py -> build\lib.win-amd64-3.9\Crypto\SelfTest\Cipher
    copying lib\Crypto\SelfTest\Cipher\test_DES.py -> build\lib.win-amd64-3.9\Crypto\SelfTest\Cipher
    copying lib\Crypto\SelfTest\Cipher\test_DES3.py -> build\lib.win-amd64-3.9\Crypto\SelfTest\Cipher
    copying lib\Crypto\SelfTest\Cipher\test_pkcs1_15.py -> build\lib.win-amd64-3.9\Crypto\SelfTest\Cipher
    copying lib\Crypto\SelfTest\Cipher\test_pkcs1_oaep.py -> build\lib.win-amd64-3.9\Crypto\SelfTest\Cipher
    copying lib\Crypto\SelfTest\Cipher\test_XOR.py -> build\lib.win-amd64-3.9\Crypto\SelfTest\Cipher
    copying lib\Crypto\SelfTest\Cipher\__init__.py -> build\lib.win-amd64-3.9\Crypto\SelfTest\Cipher
    creating build\lib.win-amd64-3.9\Crypto\SelfTest\Hash
    copying lib\Crypto\SelfTest\Hash\common.py -> build\lib.win-amd64-3.9\Crypto\SelfTest\Hash
    copying lib\Crypto\SelfTest\Hash\test_HMAC.py -> build\lib.win-amd64-3.9\Crypto\SelfTest\Hash
    copying lib\Crypto\SelfTest\Hash\test_MD2.py -> build\lib.win-amd64-3.9\Crypto\SelfTest\Hash
    copying lib\Crypto\SelfTest\Hash\test_MD4.py -> build\lib.win-amd64-3.9\Crypto\SelfTest\Hash
    copying lib\Crypto\SelfTest\Hash\test_MD5.py -> build\lib.win-amd64-3.9\Crypto\SelfTest\Hash
    copying lib\Crypto\SelfTest\Hash\test_RIPEMD.py -> build\lib.win-amd64-3.9\Crypto\SelfTest\Hash
    copying lib\Crypto\SelfTest\Hash\test_SHA.py -> build\lib.win-amd64-3.9\Crypto\SelfTest\Hash
    copying lib\Crypto\SelfTest\Hash\test_SHA224.py -> build\lib.win-amd64-3.9\Crypto\SelfTest\Hash
    copying lib\Crypto\SelfTest\Hash\test_SHA256.py -> build\lib.win-amd64-3.9\Crypto\SelfTest\Hash
    copying lib\Crypto\SelfTest\Hash\test_SHA384.py -> build\lib.win-amd64-3.9\Crypto\SelfTest\Hash
    copying lib\Crypto\SelfTest\Hash\test_SHA512.py -> build\lib.win-amd64-3.9\Crypto\SelfTest\Hash
    copying lib\Crypto\SelfTest\Hash\__init__.py -> build\lib.win-amd64-3.9\Crypto\SelfTest\Hash
    creating build\lib.win-amd64-3.9\Crypto\SelfTest\Protocol
    copying lib\Crypto\SelfTest\Protocol\test_AllOrNothing.py -> build\lib.win-amd64-3.9\Crypto\SelfTest\Protocol
    copying lib\Crypto\SelfTest\Protocol\test_chaffing.py -> build\lib.win-amd64-3.9\Crypto\SelfTest\Protocol
    copying lib\Crypto\SelfTest\Protocol\test_KDF.py -> build\lib.win-amd64-3.9\Crypto\SelfTest\Protocol
    copying lib\Crypto\SelfTest\Protocol\test_rfc1751.py -> build\lib.win-amd64-3.9\Crypto\SelfTest\Protocol
    copying lib\Crypto\SelfTest\Protocol\__init__.py -> build\lib.win-amd64-3.9\Crypto\SelfTest\Protocol
    creating build\lib.win-amd64-3.9\Crypto\SelfTest\PublicKey
    copying lib\Crypto\SelfTest\PublicKey\test_DSA.py -> build\lib.win-amd64-3.9\Crypto\SelfTest\PublicKey
    copying lib\Crypto\SelfTest\PublicKey\test_ElGamal.py -> build\lib.win-amd64-3.9\Crypto\SelfTest\PublicKey
    copying lib\Crypto\SelfTest\PublicKey\test_importKey.py -> build\lib.win-amd64-3.9\Crypto\SelfTest\PublicKey
    copying lib\Crypto\SelfTest\PublicKey\test_RSA.py -> build\lib.win-amd64-3.9\Crypto\SelfTest\PublicKey
    copying lib\Crypto\SelfTest\PublicKey\__init__.py -> build\lib.win-amd64-3.9\Crypto\SelfTest\PublicKey
    creating build\lib.win-amd64-3.9\Crypto\SelfTest\Random
    copying lib\Crypto\SelfTest\Random\test_random.py -> build\lib.win-amd64-3.9\Crypto\SelfTest\Random
    copying lib\Crypto\SelfTest\Random\test_rpoolcompat.py -> build\lib.win-amd64-3.9\Crypto\SelfTest\Random
    copying lib\Crypto\SelfTest\Random\test__UserFriendlyRNG.py -> build\lib.win-amd64-3.9\Crypto\SelfTest\Random
    copying lib\Crypto\SelfTest\Random\__init__.py -> build\lib.win-amd64-3.9\Crypto\SelfTest\Random
    creating build\lib.win-amd64-3.9\Crypto\SelfTest\Random\Fortuna
    copying lib\Crypto\SelfTest\Random\Fortuna\test_FortunaAccumulator.py -> build\lib.win-amd64-3.9\Crypto\SelfTest\Random\Fortuna
    copying lib\Crypto\SelfTest\Random\Fortuna\test_FortunaGenerator.py -> build\lib.win-amd64-3.9\Crypto\SelfTest\Random\Fortuna
    copying lib\Crypto\SelfTest\Random\Fortuna\test_SHAd256.py -> build\lib.win-amd64-3.9\Crypto\SelfTest\Random\Fortuna
    copying lib\Crypto\SelfTest\Random\Fortuna\__init__.py -> build\lib.win-amd64-3.9\Crypto\SelfTest\Random\Fortuna
    creating build\lib.win-amd64-3.9\Crypto\SelfTest\Random\OSRNG
    copying lib\Crypto\SelfTest\Random\OSRNG\test_fallback.py -> build\lib.win-amd64-3.9\Crypto\SelfTest\Random\OSRNG
    copying lib\Crypto\SelfTest\Random\OSRNG\test_generic.py -> build\lib.win-amd64-3.9\Crypto\SelfTest\Random\OSRNG
    copying lib\Crypto\SelfTest\Random\OSRNG\test_nt.py -> build\lib.win-amd64-3.9\Crypto\SelfTest\Random\OSRNG
    copying lib\Crypto\SelfTest\Random\OSRNG\test_posix.py -> build\lib.win-amd64-3.9\Crypto\SelfTest\Random\OSRNG
    copying lib\Crypto\SelfTest\Random\OSRNG\test_winrandom.py -> build\lib.win-amd64-3.9\Crypto\SelfTest\Random\OSRNG
    copying lib\Crypto\SelfTest\Random\OSRNG\__init__.py -> build\lib.win-amd64-3.9\Crypto\SelfTest\Random\OSRNG
    creating build\lib.win-amd64-3.9\Crypto\SelfTest\Util
    copying lib\Crypto\SelfTest\Util\test_asn1.py -> build\lib.win-amd64-3.9\Crypto\SelfTest\Util
    copying lib\Crypto\SelfTest\Util\test_Counter.py -> build\lib.win-amd64-3.9\Crypto\SelfTest\Util
    copying lib\Crypto\SelfTest\Util\test_number.py -> build\lib.win-amd64-3.9\Crypto\SelfTest\Util
    copying lib\Crypto\SelfTest\Util\test_winrandom.py -> build\lib.win-amd64-3.9\Crypto\SelfTest\Util
    copying lib\Crypto\SelfTest\Util\__init__.py -> build\lib.win-amd64-3.9\Crypto\SelfTest\Util
    creating build\lib.win-amd64-3.9\Crypto\SelfTest\Signature
    copying lib\Crypto\SelfTest\Signature\test_pkcs1_15.py -> build\lib.win-amd64-3.9\Crypto\SelfTest\Signature
    copying lib\Crypto\SelfTest\Signature\test_pkcs1_pss.py -> build\lib.win-amd64-3.9\Crypto\SelfTest\Signature
    copying lib\Crypto\SelfTest\Signature\__init__.py -> build\lib.win-amd64-3.9\Crypto\SelfTest\Signature
    creating build\lib.win-amd64-3.9\Crypto\Protocol
    copying lib\Crypto\Protocol\AllOrNothing.py -> build\lib.win-amd64-3.9\Crypto\Protocol
    copying lib\Crypto\Protocol\Chaffing.py -> build\lib.win-amd64-3.9\Crypto\Protocol
    copying lib\Crypto\Protocol\KDF.py -> build\lib.win-amd64-3.9\Crypto\Protocol
    copying lib\Crypto\Protocol\__init__.py -> build\lib.win-amd64-3.9\Crypto\Protocol
    creating build\lib.win-amd64-3.9\Crypto\PublicKey
    copying lib\Crypto\PublicKey\DSA.py -> build\lib.win-amd64-3.9\Crypto\PublicKey
    copying lib\Crypto\PublicKey\ElGamal.py -> build\lib.win-amd64-3.9\Crypto\PublicKey
    copying lib\Crypto\PublicKey\pubkey.py -> build\lib.win-amd64-3.9\Crypto\PublicKey
    copying lib\Crypto\PublicKey\RSA.py -> build\lib.win-amd64-3.9\Crypto\PublicKey
    copying lib\Crypto\PublicKey\_DSA.py -> build\lib.win-amd64-3.9\Crypto\PublicKey
    copying lib\Crypto\PublicKey\_RSA.py -> build\lib.win-amd64-3.9\Crypto\PublicKey
    copying lib\Crypto\PublicKey\_slowmath.py -> build\lib.win-amd64-3.9\Crypto\PublicKey
    copying lib\Crypto\PublicKey\__init__.py -> build\lib.win-amd64-3.9\Crypto\PublicKey
    creating build\lib.win-amd64-3.9\Crypto\Signature
    copying lib\Crypto\Signature\PKCS1_PSS.py -> build\lib.win-amd64-3.9\Crypto\Signature
    copying lib\Crypto\Signature\PKCS1_v1_5.py -> build\lib.win-amd64-3.9\Crypto\Signature
    copying lib\Crypto\Signature\__init__.py -> build\lib.win-amd64-3.9\Crypto\Signature
    Skipping optional fixer: buffer
    Skipping optional fixer: idioms
    Skipping optional fixer: set_literal
    Skipping optional fixer: ws_comma
    running build_ext
    warning: GMP or MPIR library not found; Not building Crypto.PublicKey._fastmath.
    building 'Crypto.Random.OSRNG.winrandom' extension
    creating build\temp.win-amd64-3.9
    creating build\temp.win-amd64-3.9\Release
    creating build\temp.win-amd64-3.9\Release\src
    C:\Program Files (x86)\Microsoft Visual Studio\2017\BuildTools\VC\Tools\MSVC\14.16.27023\bin\HostX86\x64\cl.exe /c /nologo /Ox /W3 /GL /DNDEBUG /MD -Isrc/ -Isrc/inc-msvc/ -Ic:\program files\python39\include -Ic:\program files\python39\include -IC:\Program Files (x86)\Microsoft Visual Studio\2017\BuildTools\VC\Tools\MSVC\14.16.27023\include -IC:\Program Files (x86)\Windows Kits\10\include\10.0.17763.0\ucrt -IC:\Program Files (x86)\Windows Kits\10\include\10.0.17763.0\shared -IC:\Program Files (x86)\Windows Kits\10\include\10.0.17763.0\um -IC:\Program Files (x86)\Windows Kits\10\include\10.0.17763.0\winrt -IC:\Program Files (x86)\Windows Kits\10\include\10.0.17763.0\cppwinrt /Tcsrc/winrand.c /Fobuild\temp.win-amd64-3.9\Release\src/winrand.obj
    winrand.c
    C:\Program Files (x86)\Windows Kits\10\include\10.0.17763.0\ucrt\inttypes.h(27): error C2061: errore di sintassi: identificatore 'intmax_t'
    C:\Program Files (x86)\Windows Kits\10\include\10.0.17763.0\ucrt\inttypes.h(28): error C2061: errore di sintassi: identificatore 'rem'
    C:\Program Files (x86)\Windows Kits\10\include\10.0.17763.0\ucrt\inttypes.h(28): error C2059: errore di sintassi: ';'
    C:\Program Files (x86)\Windows Kits\10\include\10.0.17763.0\ucrt\inttypes.h(29): error C2059: errore di sintassi: '}'
    C:\Program Files (x86)\Windows Kits\10\include\10.0.17763.0\ucrt\inttypes.h(31): error C2061: errore di sintassi: identificatore 'imaxdiv_t'
    C:\Program Files (x86)\Windows Kits\10\include\10.0.17763.0\ucrt\inttypes.h(31): error C2059: errore di sintassi: ';'
    C:\Program Files (x86)\Windows Kits\10\include\10.0.17763.0\ucrt\inttypes.h(41): error C2143: errore di sintassi: '{' mancante prima di '__cdecl'
    C:\Program Files (x86)\Windows Kits\10\include\10.0.17763.0\ucrt\inttypes.h(42): error C2146: errore di sintassi: ')' mancante prima dell'identificatore '_Number'
    C:\Program Files (x86)\Windows Kits\10\include\10.0.17763.0\ucrt\inttypes.h(42): error C2061: errore di sintassi: identificatore '_Number'
    C:\Program Files (x86)\Windows Kits\10\include\10.0.17763.0\ucrt\inttypes.h(42): error C2059: errore di sintassi: ';'
    C:\Program Files (x86)\Windows Kits\10\include\10.0.17763.0\ucrt\inttypes.h(43): error C2059: errore di sintassi: ')'
    C:\Program Files (x86)\Windows Kits\10\include\10.0.17763.0\ucrt\inttypes.h(46): error C2143: errore di sintassi: '{' mancante prima di '__cdecl'
    C:\Program Files (x86)\Windows Kits\10\include\10.0.17763.0\ucrt\inttypes.h(47): error C2146: errore di sintassi: ')' mancante prima dell'identificatore '_Numerator'
    C:\Program Files (x86)\Windows Kits\10\include\10.0.17763.0\ucrt\inttypes.h(47): error C2061: errore di sintassi: identificatore '_Numerator'
    C:\Program Files (x86)\Windows Kits\10\include\10.0.17763.0\ucrt\inttypes.h(47): error C2059: errore di sintassi: ';'
    C:\Program Files (x86)\Windows Kits\10\include\10.0.17763.0\ucrt\inttypes.h(47): error C2059: errore di sintassi: ','
    C:\Program Files (x86)\Windows Kits\10\include\10.0.17763.0\ucrt\inttypes.h(49): error C2059: errore di sintassi: ')'
    C:\Program Files (x86)\Windows Kits\10\include\10.0.17763.0\ucrt\inttypes.h(51): error C2143: errore di sintassi: '{' mancante prima di '__cdecl'
    C:\Program Files (x86)\Windows Kits\10\include\10.0.17763.0\ucrt\inttypes.h(57): error C2143: errore di sintassi: '{' mancante prima di '__cdecl'
    C:\Program Files (x86)\Windows Kits\10\include\10.0.17763.0\ucrt\inttypes.h(64): error C2143: errore di sintassi: '{' mancante prima di '__cdecl'
    C:\Program Files (x86)\Windows Kits\10\include\10.0.17763.0\ucrt\inttypes.h(70): error C2143: errore di sintassi: '{' mancante prima di '__cdecl'
    C:\Program Files (x86)\Windows Kits\10\include\10.0.17763.0\ucrt\inttypes.h(77): error C2143: errore di sintassi: '{' mancante prima di '__cdecl'
    C:\Program Files (x86)\Windows Kits\10\include\10.0.17763.0\ucrt\inttypes.h(83): error C2143: errore di sintassi: '{' mancante prima di '__cdecl'
    C:\Program Files (x86)\Windows Kits\10\include\10.0.17763.0\ucrt\inttypes.h(90): error C2143: errore di sintassi: '{' mancante prima di '__cdecl'
    C:\Program Files (x86)\Windows Kits\10\include\10.0.17763.0\ucrt\inttypes.h(96): error C2143: errore di sintassi: '{' mancante prima di '__cdecl'
    error: command 'C:\\Program Files (x86)\\Microsoft Visual Studio\\2017\\BuildTools\\VC\\Tools\\MSVC\\14.16.27023\\bin\\HostX86\\x64\\cl.exe' failed with exit code 2
    ----------------------------------------
ERROR: Command errored out with exit status 1: 'c:\program files\python39\python.exe' -u -c 'import sys, setuptools, tokenize; sys.argv[0] = '"'"'C:\\Users\\renzo\\AppData\\Local\\Temp\\pip-install-svmkdo9_\\pycrypto_ee48e2c475ff47aaa23d619983f3b5e3\\setup.py'"'"'; __file__='"'"'C:\\Users\\renzo\\AppData\\Local\\Temp\\pip-install-svmkdo9_\\pycrypto_ee48e2c475ff47aaa23d619983f3b5e3\\setup.py'"'"';f=getattr(tokenize, '"'"'open'"'"', open)(__file__);code=f.read().replace('"'"'\r\n'"'"', '"'"'\n'"'"');f.close();exec(compile(code, __file__, '"'"'exec'"'"'))' install --record 'C:\Users\renzo\AppData\Local\Temp\pip-record-qctz6vm0\install-record.txt' --single-version-externally-managed --user --prefix= --compile --install-headers 'C:\Users\renzo\AppData\Roaming\Python\Python39\Include\pycrypto' Check the logs for full command output.
From the log, you can get the path of Microsoft Visual Studio BuildTools, and then execute these commands:
cd "C:\Program Files (x86)\Microsoft Visual Studio\2017\BuildTools\VC\Auxiliary\Build"
vcvarsall.bat x86_amd64
cd %VCINSTALLDIR%
for /R %f in (*stdint.h) do set CL=-FI"%f"
pip install machine
D:\projects\micropython\testesp>cd "C:\Program Files (x86)\Microsoft Visual Studio\2017\BuildTools\VC\Auxiliary\Build"

D:\projects\micropython\testesp>c:

C:\Program Files (x86)\Microsoft Visual Studio\2017\BuildTools\VC\Auxiliary\Build>vcvarsall.bat x86_amd64
**********************************************************************
** Visual Studio 2017 Developer Command Prompt v15.0
** Copyright (c) 2017 Microsoft Corporation
**********************************************************************
[vcvarsall.bat] Environment initialized for: 'x86_x64'

C:\Program Files (x86)\Microsoft Visual Studio\2017\BuildTools\VC\Auxiliary\Build>cd %VCINSTALLDIR%

C:\Program Files (x86)\Microsoft Visual Studio\2017\BuildTools\VC>for /R %f in (*stdint.h) do set CL=-FI"%f"

C:\Program Files (x86)\Microsoft Visual Studio\2017\BuildTools\VC>set CL=-FI"C:\Program Files (x86)\Microsoft Visual Studio\2017\BuildTools\VC\Tools\MSVC\14.16.27023\include\stdint.h"
C:\Program Files (x86)\Microsoft Visual Studio\2017\BuildTools\VC>pip install pycrypto
Defaulting to user installation because normal site-packages is not writeable
Collecting pycrypto
  Using cached pycrypto-2.6.1.tar.gz (446 kB)
Using legacy 'setup.py install' for pycrypto, since package 'wheel' is not installed.
Installing collected packages: pycrypto
    Running setup.py install for pycrypto ... done
Successfully installed pycrypto-2.6.1
C:\Program Files (x86)\Microsoft Visual Studio\2017\BuildTools\VC>pip install machine
Defaulting to user installation because normal site-packages is not writeable
Collecting machine
  Using cached machine-0.0.1-py2.py3-none-any.whl (4.2 kB)
Requirement already satisfied: pycrypto in c:\users\renzo\appdata\roaming\python\python39\site-packages (from machine) (2.6.1)
Installing collected packages: machine
  WARNING: The script sample.exe is installed in 'C:\Users\renzo\AppData\Roaming\Python\Python39\Scripts' which is not on PATH.
  Consider adding this directory to PATH or, if you prefer to suppress this warning, use --no-warn-script-location.
Successfully installed machine-0.0.1
Control a LED
To control an LED connected to pin PC13 on an ESP8266 board (It’s the builtin led for WeMos D1 mini), you can enter the following commands:
import machine
pin = machine.Pin('PC13', machine.Pin.OUT)
pin.on()
pin.off()
The first line imports the machine module, which contains classes and functions for interacting with the hardware of the ESP8266 or ESP32 board.
The second line creates a new Pin object, which represents a GPIO pin on the board. In this case, the Pin object is created with 2 as the pin number and machine.Pin.OUT as the mode, which sets the pin as an output. The Pin object is assigned to the variable pin.
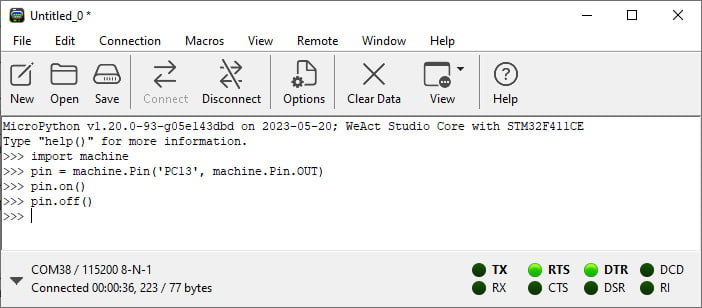
This turns on the output of the pin object, which will cause the corresponding physical pin on the board to output a high voltage.
This turns off the output of the pin object, which will cause the corresponding physical pin on the board to output a low voltage.
Writing blink-led sketch
Here is a complete MicroPython sketch, the simple program that blink a built-in led.
Take your preferred editor, create a main.py file, and add these lines.
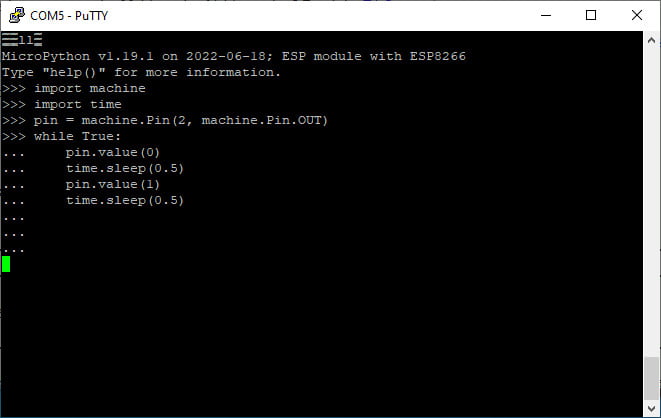
import machine
import utime
pin = machine.Pin('PC13', machine.Pin.OUT)
while True:
    pin.value(0)
    utime.sleep_ms(500)
    pin.value(1)
    utime.sleep_ms(500)
Naturally, you can also test it in a real-time session.
To pass multiple lines you must:
Ctrl+E- Paste the code
Ctrl+D
Upload the code and view the output using a serial monitor
Upload the MicroPython code to your STM32 board using the adafruit-ampy command-line tool and view the output using a serial monitor:
- Connect your ESP8266 or ESP32 board to your computer via USB.
- Install the
adafruit-ampypackage using pip, which is a package manager for Python. You can install this package by opening a command prompt (Windows) or terminal (macOS/Linux) and running the following command:
pip install adafruit-ampy
D:\projects\micropython\testesp>pip install adafruit-ampy
Defaulting to user installation because normal site-packages is not writeable
Collecting adafruit-ampy
  Downloading adafruit_ampy-1.1.0-py2.py3-none-any.whl (16 kB)
Collecting click
  Using cached click-8.1.3-py3-none-any.whl (96 kB)
Requirement already satisfied: pyserial in c:\users\renzo\appdata\roaming\python\python39\site-packages (from adafruit-ampy) (3.0.1)
Collecting python-dotenv
  Downloading python_dotenv-1.0.0-py3-none-any.whl (19 kB)
Collecting colorama
  Downloading colorama-0.4.6-py2.py3-none-any.whl (25 kB)
Installing collected packages: python-dotenv, colorama, click, adafruit-ampy
  WARNING: The script dotenv.exe is installed in 'C:\Users\renzo\AppData\Roaming\Python\Python39\Scripts' which is not on PATH.
  Consider adding this directory to PATH or, if you prefer to suppress this warning, use --no-warn-script-location.
  WARNING: The script ampy.exe is installed in 'C:\Users\renzo\AppData\Roaming\Python\Python39\Scripts' which is not on PATH.
  Consider adding this directory to PATH or, if you prefer to suppress this warning, use --no-warn-script-location.
Successfully installed adafruit-ampy-1.1.0 click-8.1.3 colorama-0.4.6 python-dotenv-1.0.0
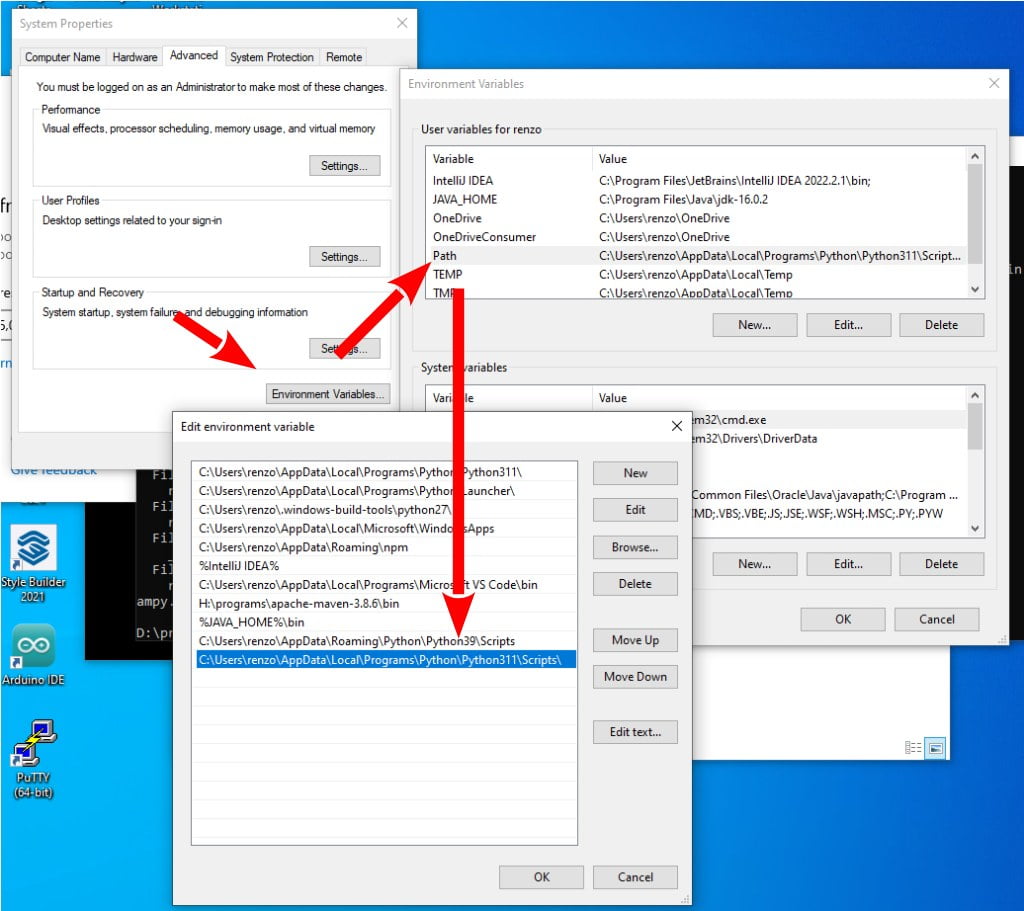
- You can also see a warning in the installation process
WARNING: The script ampy.exe is installed in 'C:\Users\renzo\AppData\Roaming\Python\Python39\Scripts' which is not on PATH.
So we are going to add the Script PATH also to the path variable.
- Search in the windows menu “
Edit the system environment variables“; - In the panel click
Environment variables.... - In user variables, select “
Path“ - And add the Script folder.
- Write your MicroPython code in a file on your computer.
- Use the
ampycommand-line tool to upload the file to the board. For example, if your MicroPython code is in a file calledmain.pyand your board is connected to the serial portCOM5, you can run the following command:
ampy --port COM5 put main.py
Note: Replace COM5 with the correct serial port of your board, and main.py with the name of your MicroPython code file.
- Once your serial monitor is set up, reset the board by pressing the reset button or unplugging and plugging in the USB cable. The board will automatically start running the code that you uploaded, and you should see the output of your MicroPython code in the serial monitor.