MicroPython with esp8266 and esp32: flashing firmware and using PyCharm IDE – 3
If you’re looking to start programming microcontrollers using Python, then MicroPython with esp8266 and esp32 is an excellent place to begin. With MicroPython, you can use Python to program microcontrollers and control devices like sensors, motors, and lights.
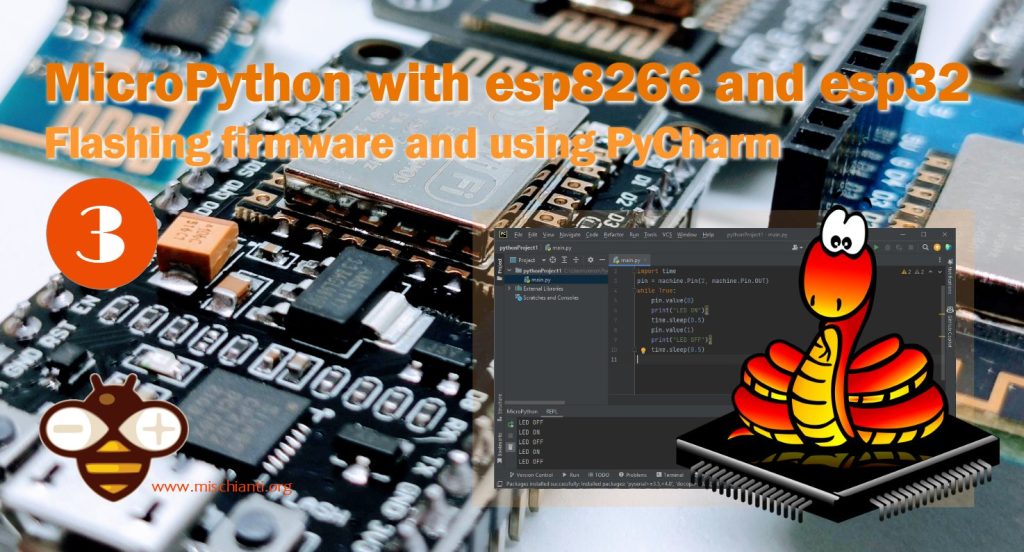
One of the easiest ways to get started with MicroPython on esp8266 and esp32 is to use PyCharm as your integrated development environment (IDE). In this article, we’ll take a look at how to set up PyCharm for MicroPython development, and we’ll create a simple project to blink an LED.
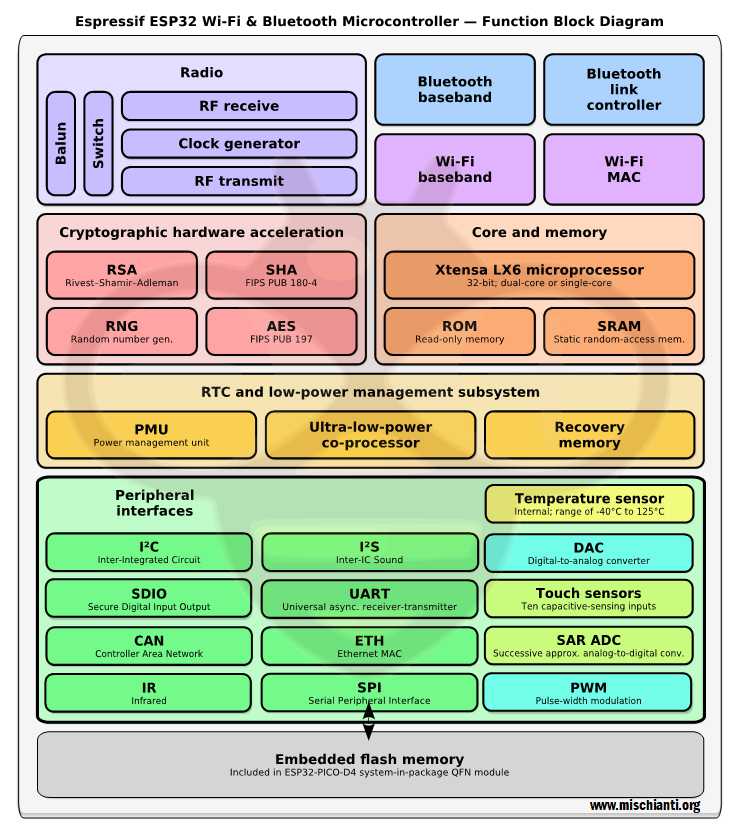
ESP32 details
I like these devices. It’s very powerful and low cost with an effective value WIFI microcontroller.
You can find It here ESP32 Dev Kit v1 - TTGO T-Display 1.14 ESP32 - NodeMCU V3 V2 ESP8266 Lolin32 - NodeMCU ESP-32S - WeMos Lolin32 - WeMos Lolin32 mini - ESP32-CAM programmer - ESP32-CAM bundle - ESP32-WROOM-32 - ESP32-S
Specs
Remember that exist a lot of variants of this device. Some have a specified killer function, so this is a generic specs description.
- Processors:
- CPU: Xtensa dual-core (or single-core) 32-bit LX6 microprocessor, operating at 160 or 240 MHz and performing at up to 600 DMIPS
- Ultra low power (ULP) co-processor
- Memory: 520 KiB SRAM
- Wireless connectivity:
- Wi-Fi: 802.11 b/g/n
- Bluetooth: v4.2 BR/EDR and BLE (shares the radio with Wi-Fi)
- Peripheral interfaces:
- 12-bit SAR ADC up to 18 channels
- 2 × 8-bit DACs
- 10 × touch sensors (capacitive sensing GPIOs)
- 4 × SPI
- 2 × I²S interfaces
- 2 × I²C interfaces
- 3 × UART
- SD/SDIO/CE-ATA/MMC/eMMC host controller
- SDIO/SPI slave controller
- Ethernet MAC interface with dedicated DMA and IEEE 1588 Precision Time Protocol support
- CAN bus 2.0
- Infrared remote controller (TX/RX, up to 8 channels)
- Motor PWM
- LED PWM (up to 16 channels)
- Hall effect sensor
- Ultra low-power analog pre-amplifier
- Security:
- IEEE 802.11 standard security features all supported, including WFA, WPA/WPA2 and WAPI
- Secure boot
- Flash encryption
- 1024-bit OTP, up to 768-bit for customers
- Cryptographic hardware acceleration: AES, SHA-2, RSA, elliptic curve cryptography (ECC), random number generator (RNG)
- Power management:
- Internal low-dropout regulator
- Individual power domain for RTC
- 5μA deep sleep current
- Wake up from GPIO interrupt, timer, ADC measurements, capacitive touch sensor interrupt
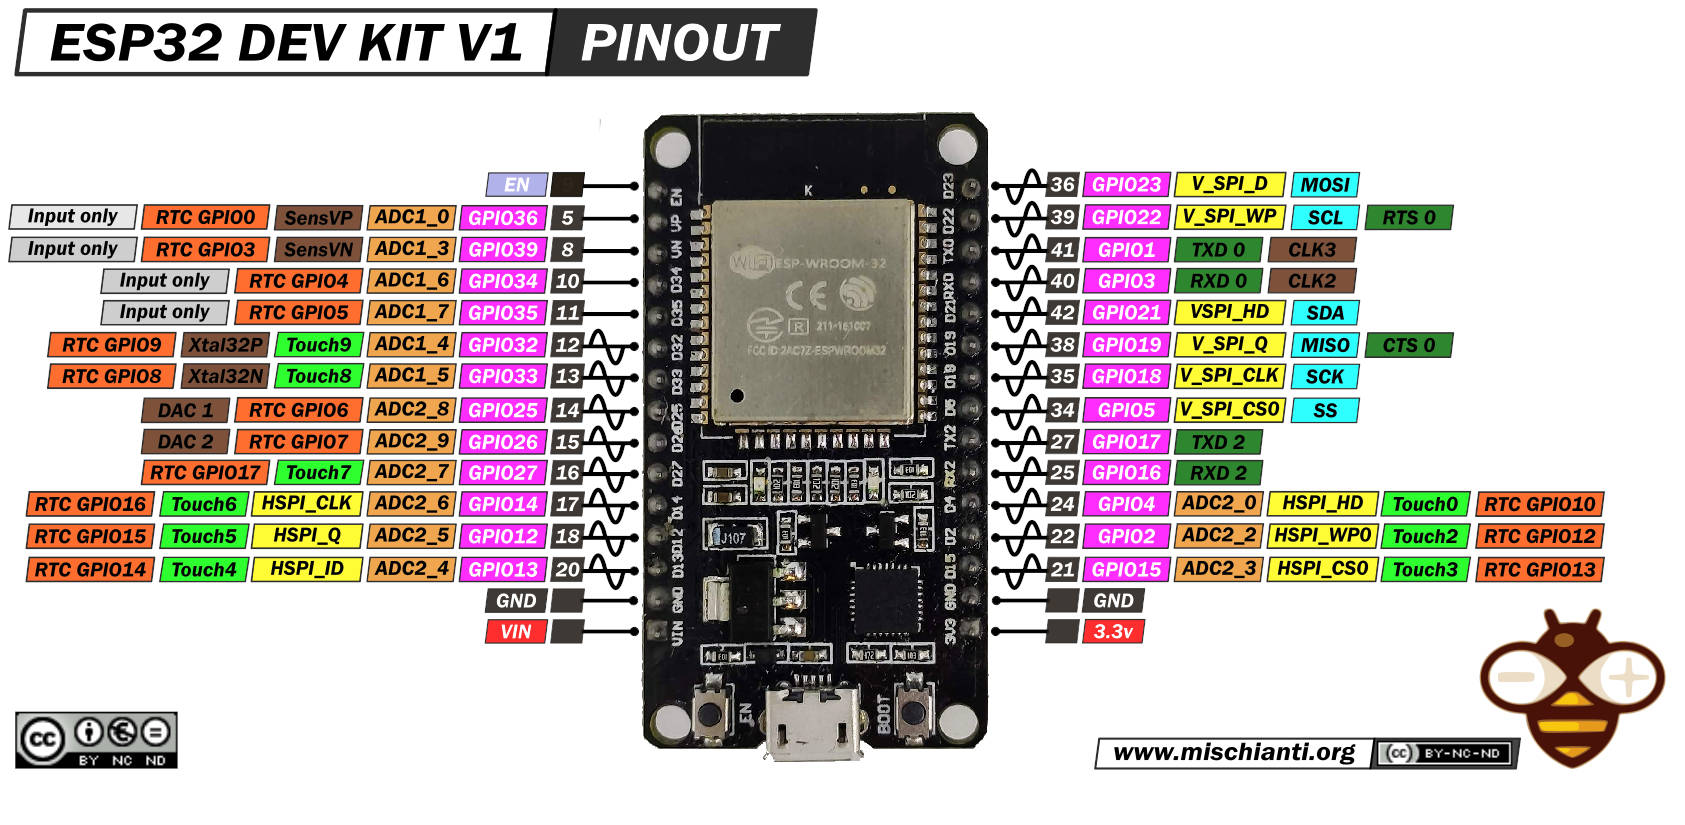
Pinouts
ESP32 DEV KIT v1
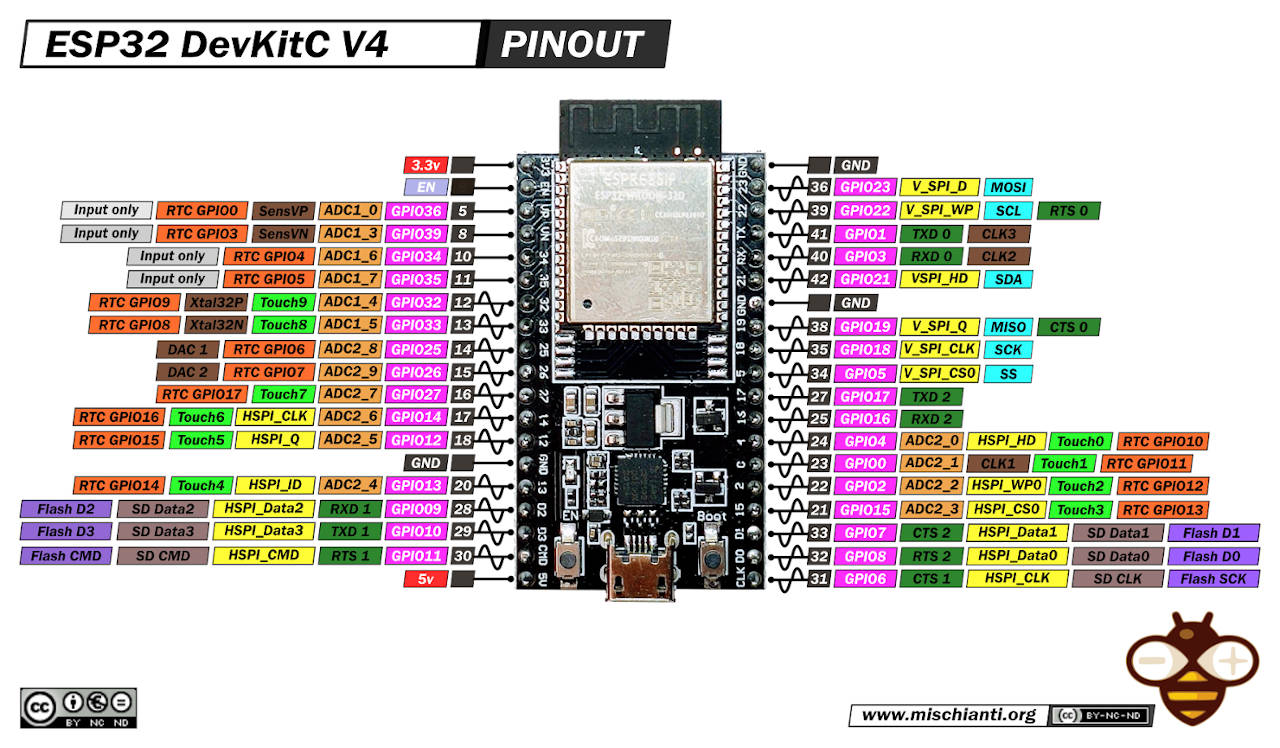
ESP32 DevKIT v4
ESP32 WeMos LOLIN32
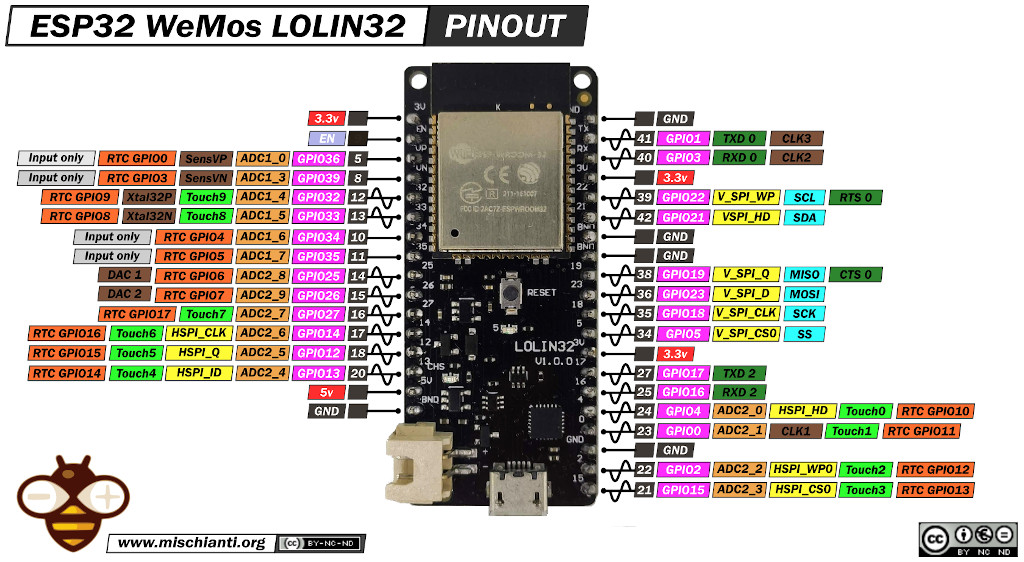
This device is very powerful, and you can see that there are capacitive touch pins, more than one UART various Analog pins.
How to
You must download drivers for the USB chip, probably you have an esp32 version with cp2102, but exist a variant with ch340 chip.
ESP8266 details
You can find It here WeMos D1 mini - NodeMCU V2 V2.1 V3 - esp01 - esp01 programmer
Specs
- Processor: L106 32-bit RISC microprocessor core based on the Tensilica Xtensa Diamond Standard 106Micro running at 80 MHz[5]
- Memory:
- 32 KiB instruction RAM
- 32 KiB instruction cache RAM
- 80 KiB user-data RAM
- 16 KiB ETS system-data RAM
- External QSPI flash: up to 16 MiB is supported (512 KiB to 4 MiB typically included)
- IEEE 802.11 b/g/n Wi-Fi
- Integrated TR switch, balun, LNA, power amplifier and matching network
- WEP or WPA/WPA2 authentication, or open networks
- 16 GPIO pins
- SPI
- I²C (software implementation)
- I²S interfaces with DMA (sharing pins with GPIO)
- UART on dedicated pins, plus a transmit-only UART, can be enabled on GPIO2
- 10-bit ADC (successive approximation ADC)
Pinouts
Wemos D1 mini
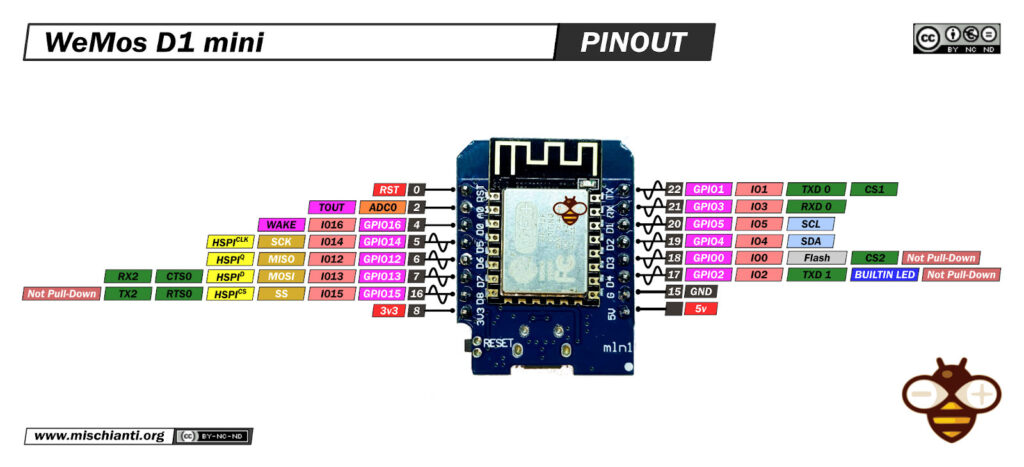
WeMos D1 mini high-resolution image
NodeMCU V2
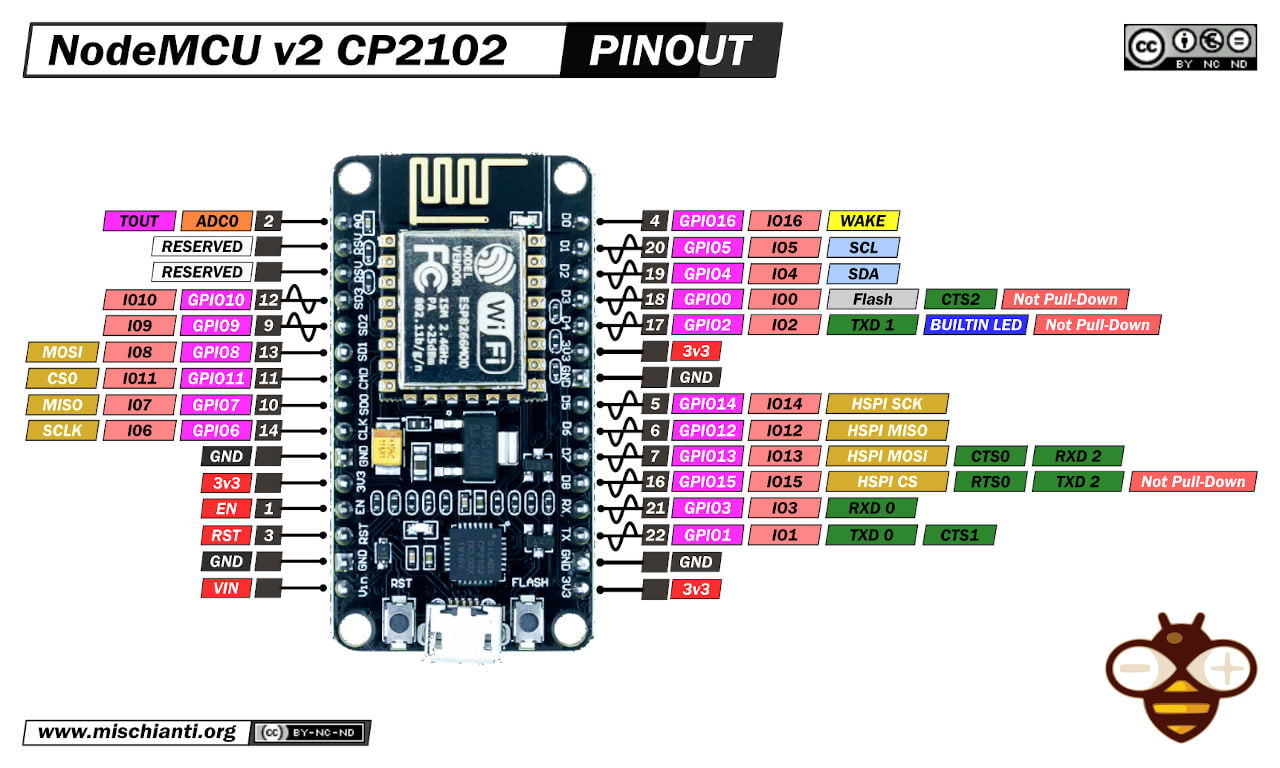
NodeMCU v2.x high-resolution image
NodeMCU v2.1
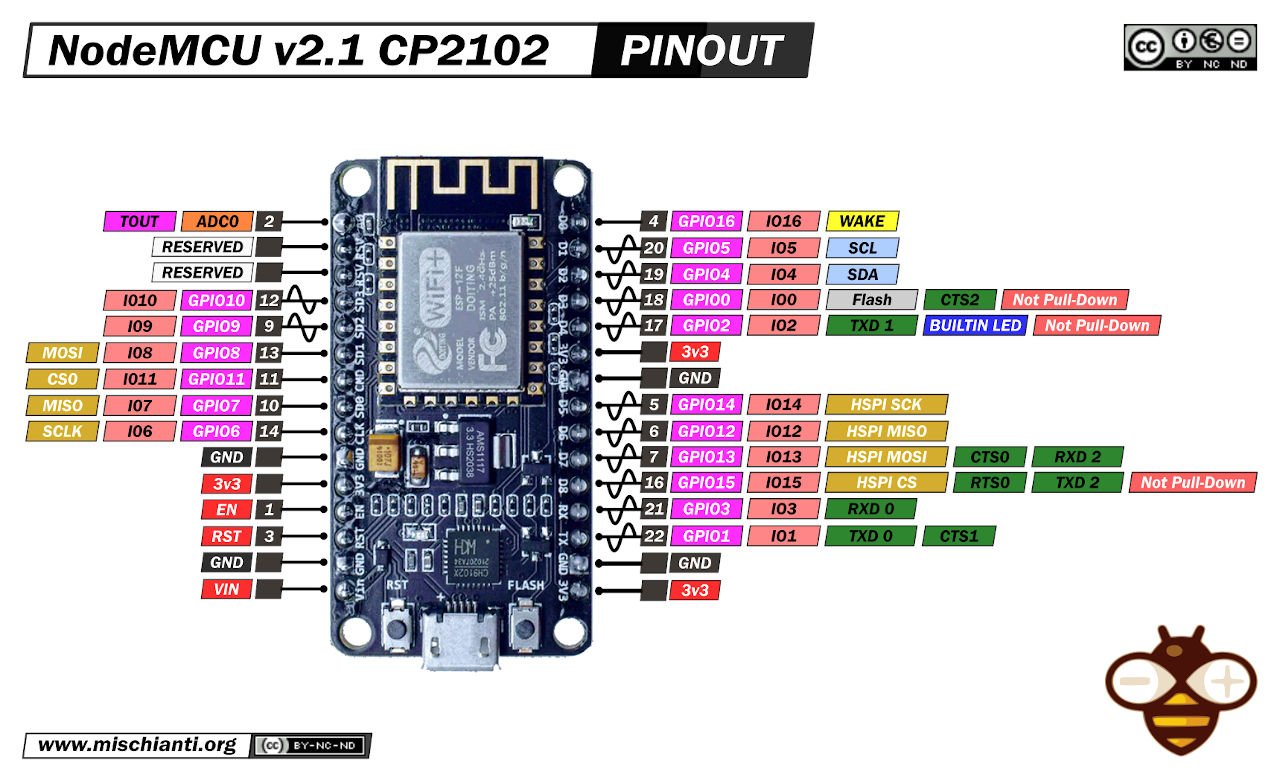
NodeMCU v2.x high-resolution image
NodeMCU v3
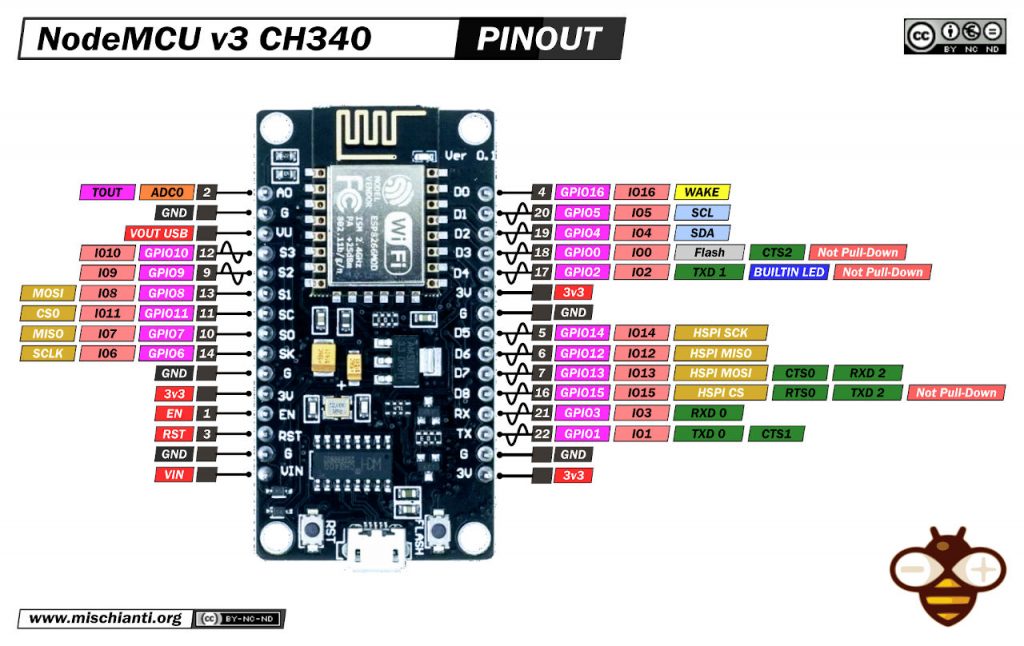
I think that the interesting thing is that It has more than one Hardware Serial, so you can use Serial for communication with devices and Serial1 D4 (only Transmission) to debug.
Drivers
You can download drivers for the USB chips here, check your version of D1 mini and click on drivers.
Here is a more exhaustive list of devices.
- Arduino
- esp8285
- esp8266
- ESP32
- DOIT ESP32 DEV KIT v1
- ESP32 DevKitC v4
- ESP32 WeMos LOLIN32
- ESP32 WeMos LOLIN32 Lite
- ESP32 WeMos LOLIN D32
- ESP32-wroom-32
- NodeMCU-32S
- ESP32-S
- ESP32-CAM
- ESP32-2432S028 (Cheap Yellow Display)
- ESP32-2432S032 (Cheap Yellow Display)
- ESP32 s2
- ESP32c3
- ESP32s3
- Arduino SAMD
- STM32
- Raspberry Pi
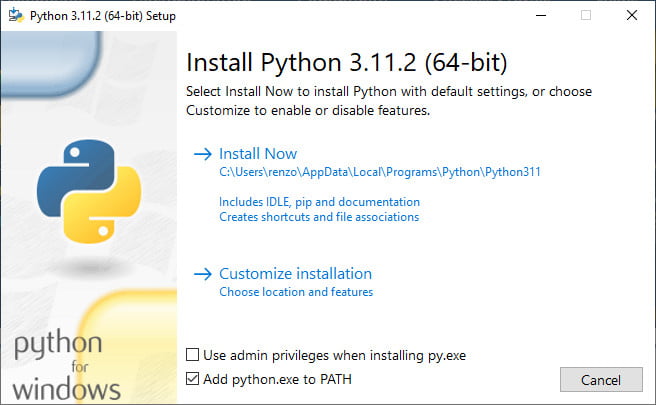
You need python
First of all, you need to install Python and download It from here.
And remember to add It to the PATH.
Flashing MicroPython firmware on the board
To install MicroPython on your ESP8266 or ESP32 board, you will need to download the firmware from the official MicroPython website. The firmware is available in binary form for a variety of microcontrollers, including the ESP8266 and ESP32.
- Download the firmware
- To download the firmware for the ESP8266, go to the following URL:
- esp8266: here is the list of firmware devices.
- To download the firmware for the ESP32, go to the following URL:
- esp32: here is the list of firmware devices;
- esp32s2: here is the list of firmware devices;
- esp32s3: here is the list of firmware devices;
- esp32c3: here is the list of firmware devices;
- To download the firmware for the ESP8266, go to the following URL:
- Install the
esptool.pytool, which is a command-line utility that can be used to flash the MicroPython firmware onto the board. The tool can be installed using pip, a Python package manager.- For Windows users:
- Open Command Prompt
- Install pip by running the following command (you probably don’t need this step):
python -m ensurepip - Install esptool.py by running the following command:
pip install esptool
- For Mac or Linux users:
- Open Terminal
- Install pip by running the following command:
sudo easy_install pip - Install esptool.py by running the following command:
sudo pip install esptool
- For Windows users:
C:\Users\renzo>pip install esptool
Defaulting to user installation because normal site-packages is not writeable
Collecting esptool
  Downloading esptool-4.5.1.tar.gz (252 kB)
     |████████████████████████████████| 252 kB 2.2 MB/s
Collecting bitstring>=3.1.6
  Downloading bitstring-4.0.1-py3-none-any.whl (45 kB)
     |████████████████████████████████| 45 kB 3.2 MB/s
Collecting cryptography>=2.1.4
  Downloading cryptography-39.0.2-cp36-abi3-win_amd64.whl (2.5 MB)
     |████████████████████████████████| 2.5 MB 2.2 MB/s
Collecting ecdsa>=0.16.0
  Downloading ecdsa-0.18.0-py2.py3-none-any.whl (142 kB)
     |████████████████████████████████| 142 kB 2.2 MB/s
Requirement already satisfied: pyserial>=3.0 in c:\users\renzo\appdata\roaming\python\python39\site-packages (from esptool) (3.0.1)
Collecting reedsolo<=1.6.0,>=1.5.3
  Downloading reedsolo-1.6.0.tar.gz (278 kB)
     |████████████████████████████████| 278 kB 2.2 MB/s
Collecting cffi>=1.12
  Downloading cffi-1.15.1-cp39-cp39-win_amd64.whl (179 kB)
     |████████████████████████████████| 179 kB 2.2 MB/s
Collecting pycparser
  Downloading pycparser-2.21-py2.py3-none-any.whl (118 kB)
     |████████████████████████████████| 118 kB 2.2 MB/s
Collecting six>=1.9.0
  Downloading six-1.16.0-py2.py3-none-any.whl (11 kB)
Using legacy 'setup.py install' for esptool, since package 'wheel' is not installed.
Using legacy 'setup.py install' for reedsolo, since package 'wheel' is not installed.
Installing collected packages: pycparser, six, cffi, reedsolo, ecdsa, cryptography, bitstring, esptool
    Running setup.py install for reedsolo ... done
    Running setup.py install for esptool ... done
Successfully installed bitstring-4.0.1 cffi-1.15.1 cryptography-39.0.2 ecdsa-0.18.0 esptool-4.5.1 pycparser-2.21 reedsolo-1.6.0 six-1.16.0
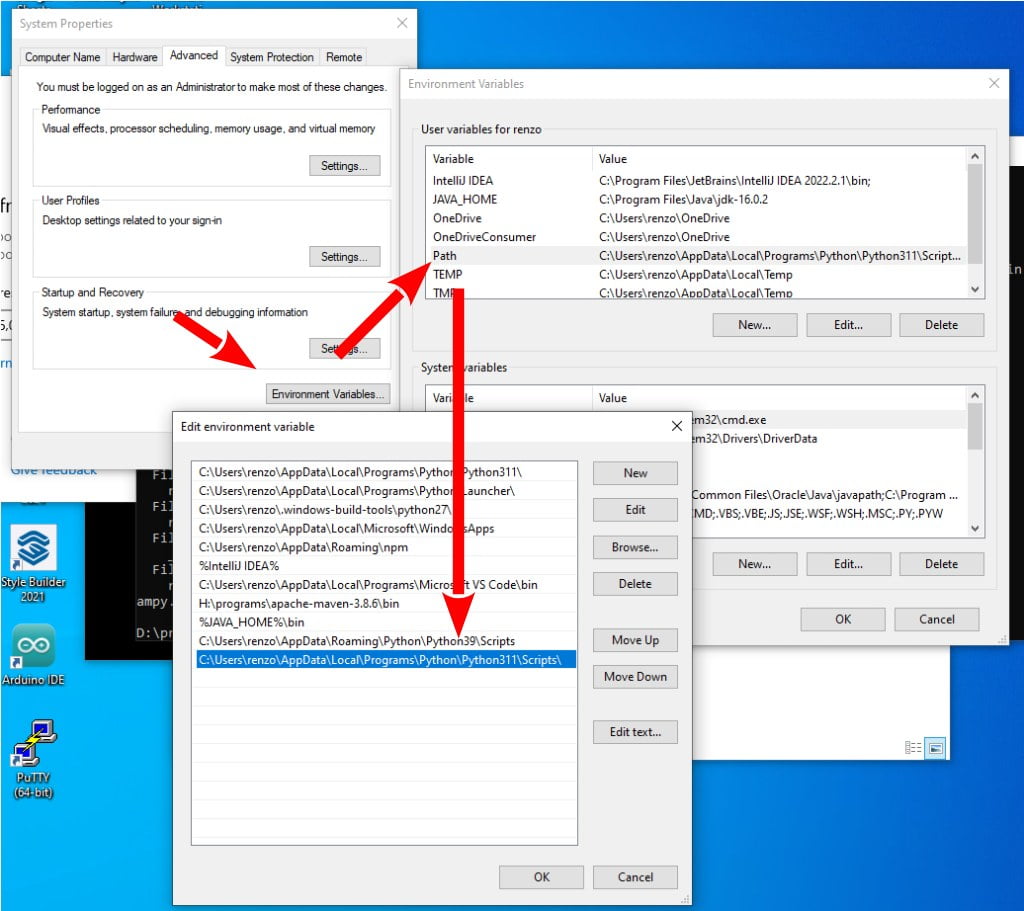
If you add the Script folder to the PATH variable, you can directly call the esptool.py.
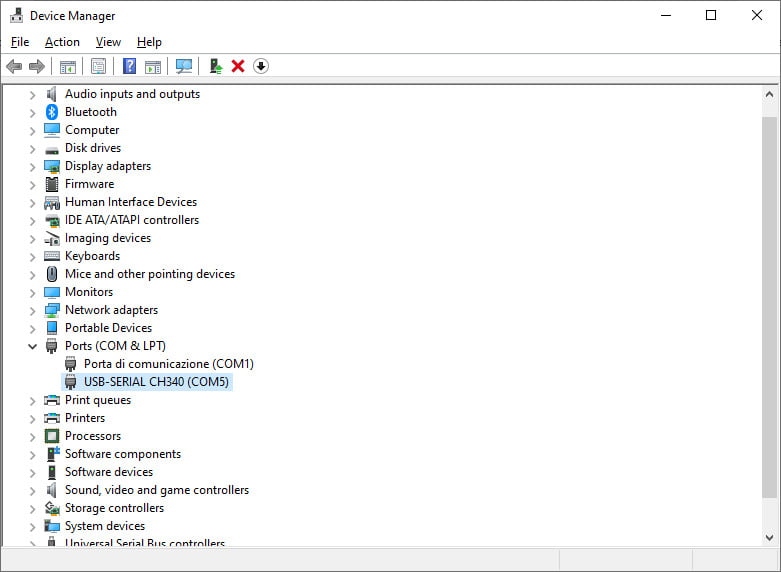
- Connect the board to your computer via USB.
To find the new Serial COM port, go to Device Manager from windows menù and check which port is born.
- Search in the windows menu “
Edit the system environment variables“; - In the panel click
Environment variables.... - In user variables, select “
Path“ - And add the Script folder.
- Erase the flash memory of the board by running the following command:
For ESP8266 and esp32:
esptool.py --port COM5 erase_flash
If you don’t have esptool.py in path use this command
python -m esptool --port COM5 erase_flash
Replace COM5 with the correct serial port of your board.
D:\projects\micropython\testesp>python -m esptool --port COM5 erase_flash
esptool.py v4.5.1
Serial port COM5
Connecting....
Detecting chip type... Unsupported detection protocol, switching and trying again...
Connecting....
Detecting chip type... ESP8266
Chip is ESP8266EX
Features: WiFi
Crystal is 26MHz
MAC: 50:02:91:74:fd:2f
Uploading stub...
Running stub...
Stub running...
Erasing flash (this may take a while)...
Chip erase completed successfully in 8.6s
Hard resetting via RTS pin...
- Flash the MicroPython firmware onto the board by running the following command:
For ESP8266:
esptool.py --port COM5 --baud 460800 write_flash --flash_size=detect 0 <firmware.bin>
or
python -m esptool --port COM5 --baud 460800 write_flash --flash_size=detect 0 <firmware.bin>
For ESP32:
esptool.py --port /dev/ttyUSB0 --baud 460800 write_flash -z 0x1000 <firmware.bin>
or
python -m esptool --port /dev/ttyUSB0 --baud 460800 write_flash -z 0x1000 <firmware.bin>
Replace COM5 with the correct serial port of your board and <firmware.bin> with the path to the MicroPython firmware file that you downloaded earlier.
D:\projects\micropython\testesp>python -m esptool --port COM5 --baud 460800 write_flash --flash_size=detect 0 esp8266-20220618-v1.19.1.bin
esptool.py v4.5.1
Serial port COM5
Connecting....
Detecting chip type... Unsupported detection protocol, switching and trying again...
Connecting....
Detecting chip type... ESP8266
Chip is ESP8266EX
Features: WiFi
Crystal is 26MHz
MAC: 50:02:91:74:fd:2f
Uploading stub...
Running stub...
Stub running...
Changing baud rate to 460800
Changed.
Configuring flash size...
Auto-detected Flash size: 4MB
Flash will be erased from 0x00000000 to 0x0009afff...
Flash params set to 0x0040
Compressed 634844 bytes to 419808...
Wrote 634844 bytes (419808 compressed) at 0x00000000 in 10.0 seconds (effective 509.5 kbit/s)...
Hash of data verified.

Leaving...
Hard resetting via RTS pin...
- Once the firmware has been flashed onto the board, you can connect to the board using a serial terminal program, such as PuTTY (Windows) or screen (Mac/Linux). The baud rate should be set to 115200.
Starting with PyCharm
Put on work PyCharm is quite simple, here the settings process.
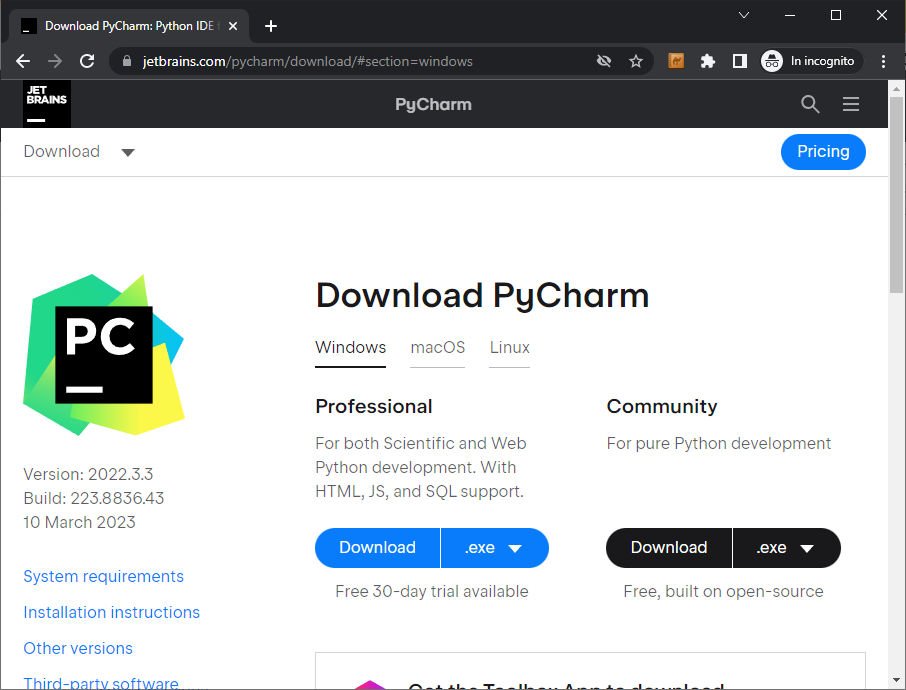
Install the IDE
Download the PyCharm Community edition from the JetBrains website.
After that, start the installation wizard.
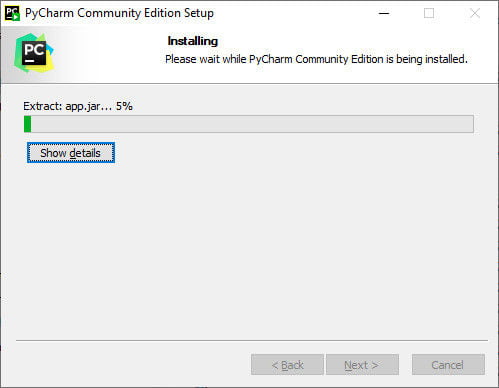
Now start the program.

Install and set MicroPython plugin
On the Welcome page,
- select the menu item
Plugin; - search MicroPython;
- and install It.
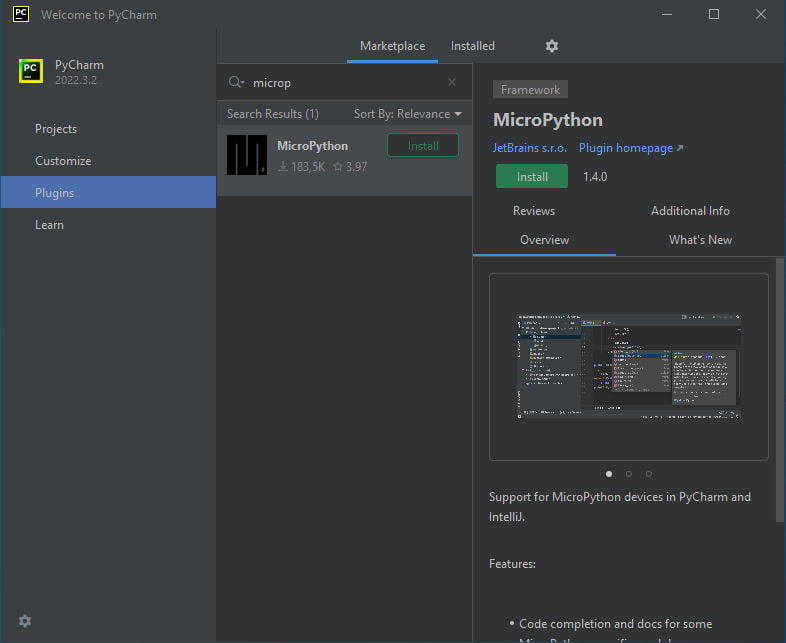
Now restart the IDE.
At this time, select the Project menu item, and the New Project button.
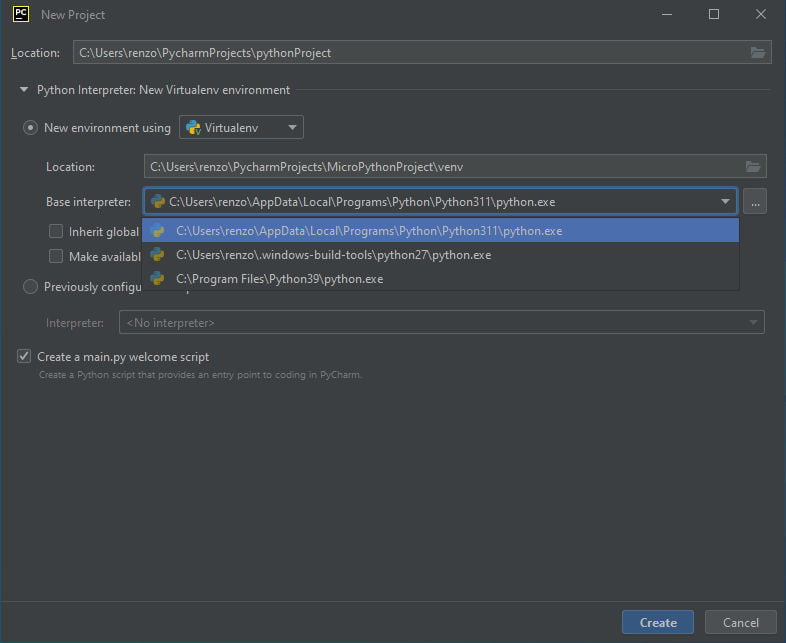
In the Location select or write the folder name of the project (I write pythonProject).
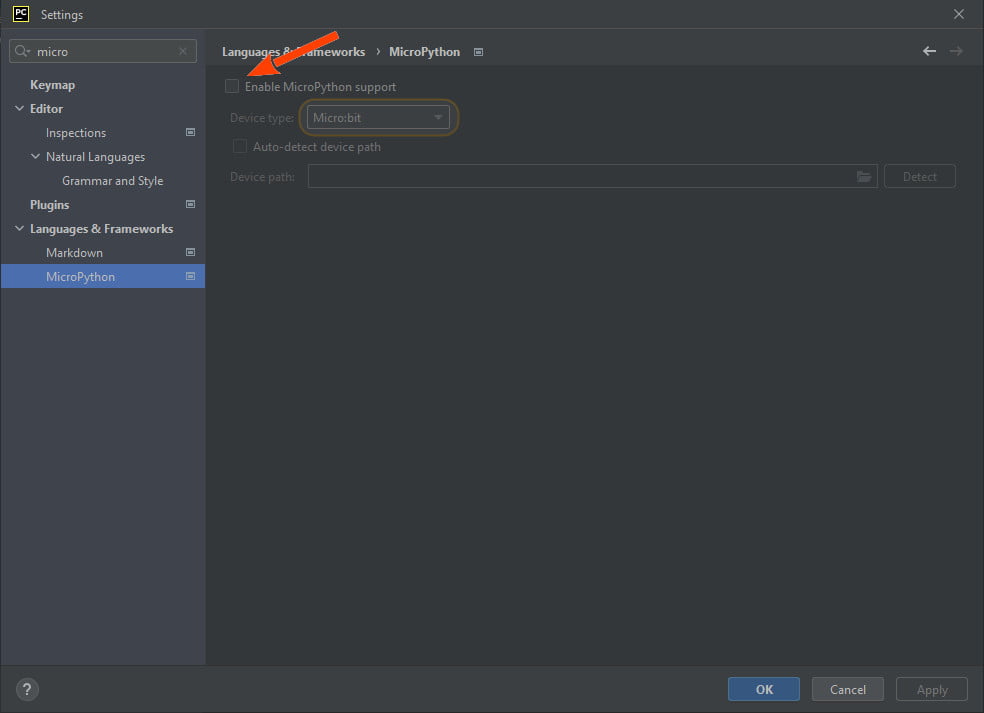
Now you must enable MicroPython support, to do that:
- Click on
File --> Settings; - Now go to
Language & Framework --> MicroPython; - Check
Enable MicroPython support.
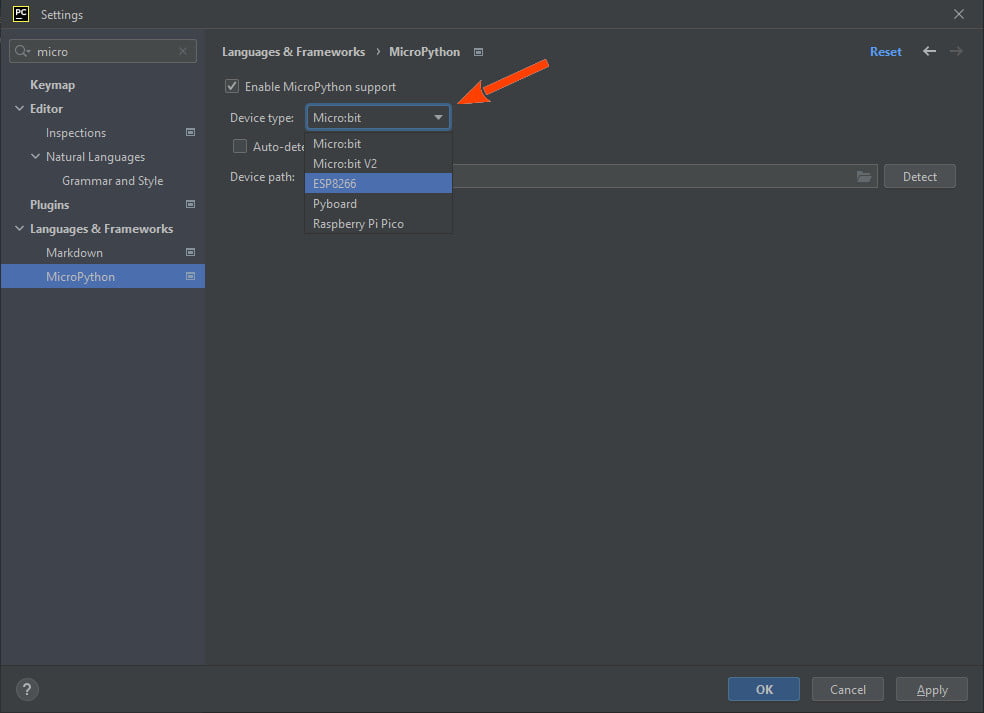
Now select the correct microcontroller framework, for ESP32 and esp8266 is ESP8266 item.
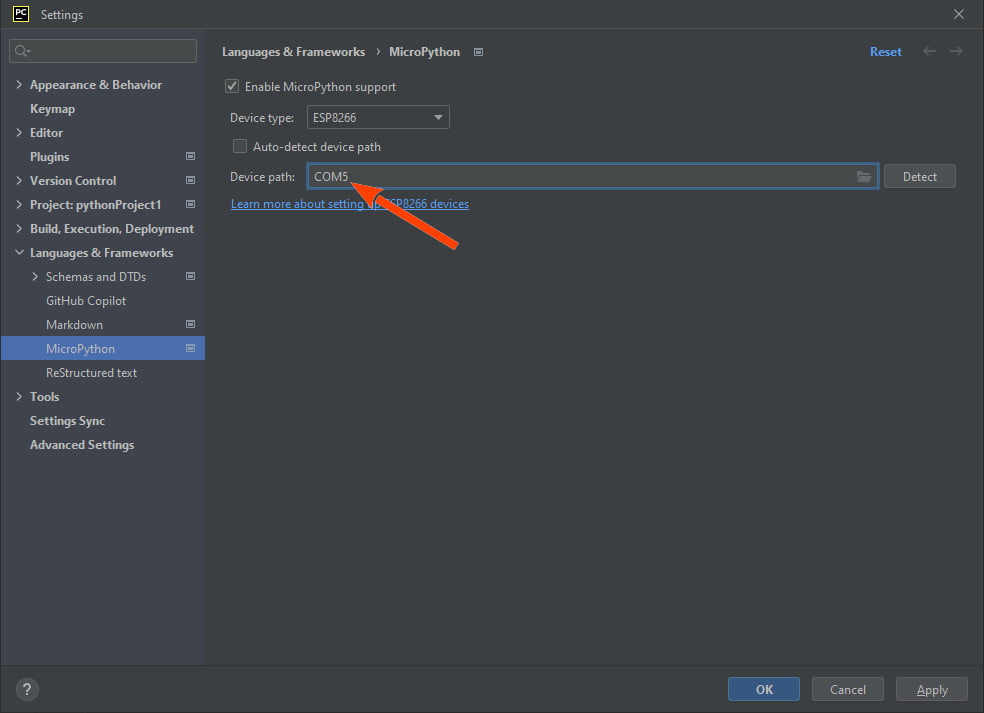
Now you must add the correct Serial COM port, and you can get It as described in the previous part of this article. Write It in the Device path.
Your first print sketch
When you close the modal, create a python file main.py and add this line of code.
print("Hello from www.mischianti.org")
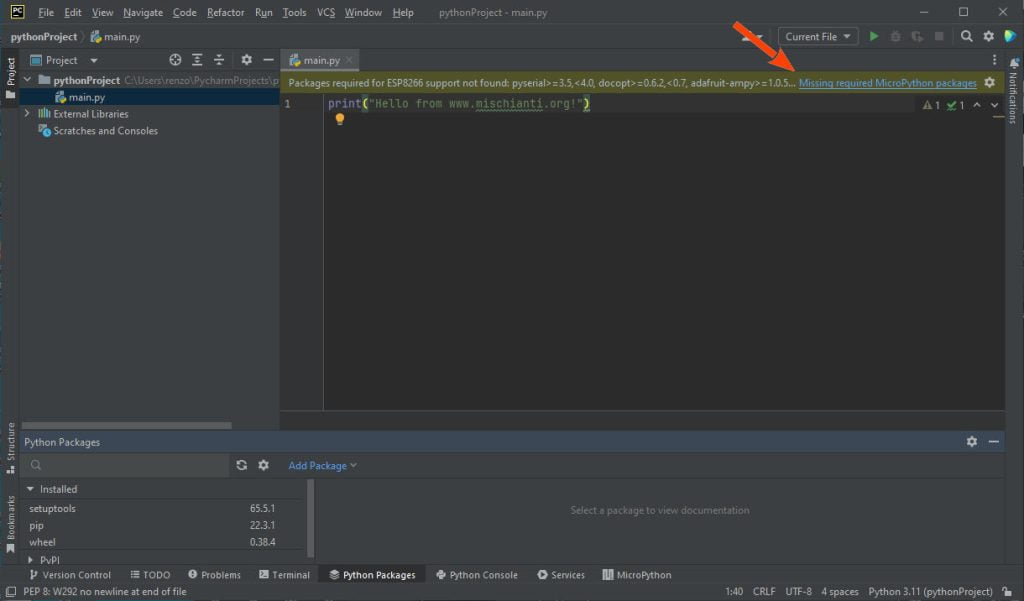
As you can see, the IDE alerts you that some dependencies are missing. You must simply click Missing required MicroPython packages, and the IDE fixes It for you.
Now the project It’s ready, to start the program you must only click with the right button of the mouse over the py file and click on the link Run "Flash main.py".
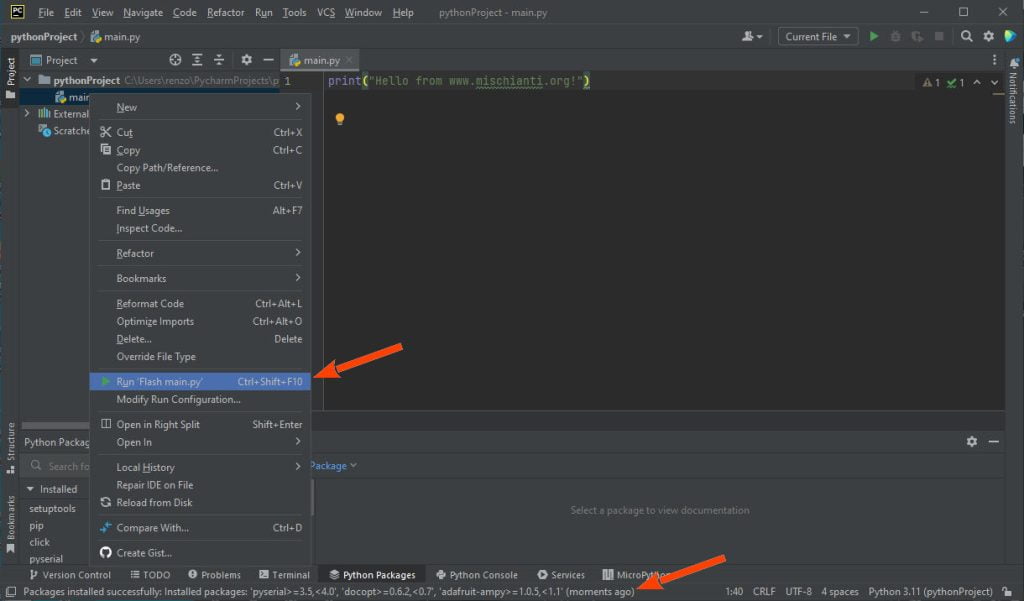
The IDE creates a starter in the up right part of the IDE bar, and the program start.

The following times you must only click on the green arrow to the right of the starter.
The result in the Run console is:
Connecting to COM5
Uploading files: 0% (0/1)
C:\Users\renzo\PycharmProjects\pythonProject\main.py -> main.py
Uploading files: 100% (1/1)
Soft reboot
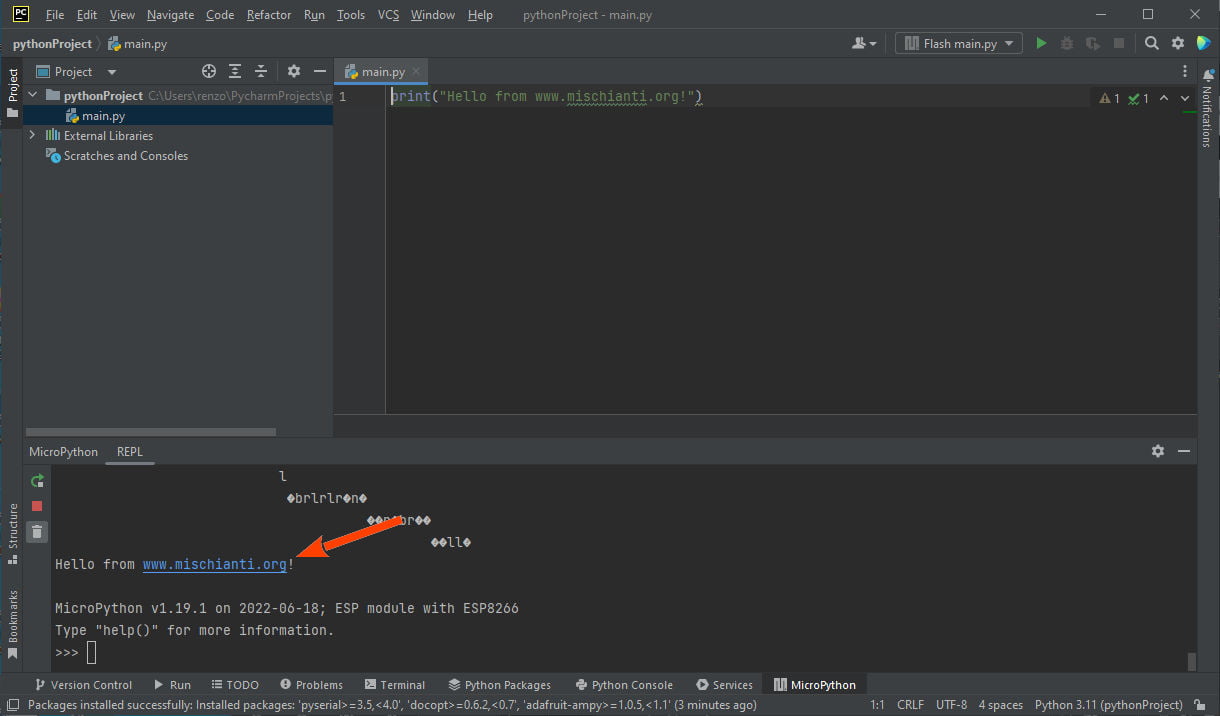
Now if you open the MicroPython tab to the bottom of the IDE, click on the restart arrow on the left of the MicroPython (REPL) console, and reset the device, you get this:
                                              ��ll�
Hello from www.mischianti.org

MicroPython v1.19.1 on 2022-06-18; ESP module with ESP8266
Type "help()" for more information.
>>>
Interactive REPL console
As you can see, you can use the REPL (Read-Eval-Print Loop) to interact with the board and run Python code. The REPL is a simple way to enter Python commands and see their output in real-time. You can connect to the board’s REPL using a serial terminal program, like PuTTY or screen, over a USB connection.
So if you are going to write this code on the REPL console:
print("Hello from www.mischianti.org! directly from console")

You receive back these lines:
Hello from www.mischianti.org! directly from console
>>>
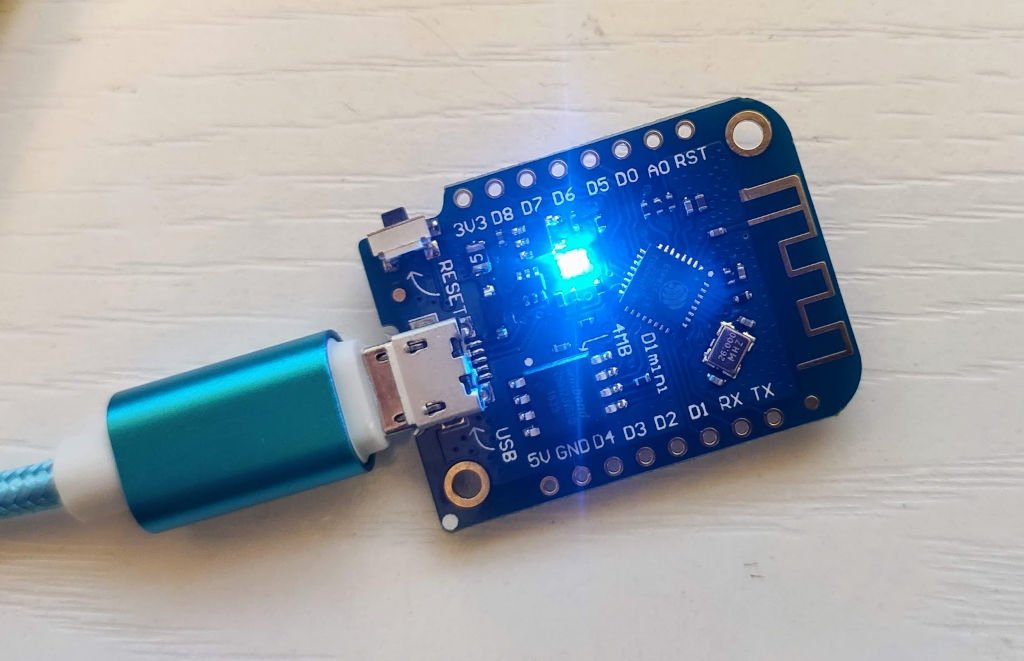
Blink and print sketch
Now we are going to write a more complex sketch that interacts with the device.
Take this code:
import machine
import time
pin = machine.Pin(2, machine.Pin.OUT)
while True:
    pin.value(0)
    print("LED ON");
    time.sleep(0.5)
    pin.value(1)
    print("LED OFF");
    time.sleep(0.5)
The code first imports two modules: machine and time. The machine module provides access to the hardware peripherals of the microcontroller, while the time module provides functions for working with time and delays.
Next, the code sets up a GPIO pin on the microcontroller (in this case, pin 2) as an output pin using the machine.Pin() method with the machine.Pin.OUT argument.
The code then enters a loop that will run indefinitely (since the condition True is always true). Within the loop, the code first sets the pin to 0, which turns the LED connected to it on. It then prints LED ON to the console using the print() function. The code then waits for half a second using the time.sleep() function.

Next, the code sets the pin to 1, which turns the LED off, and prints LED OFF to the console. It then waits for another half a second before repeating the loop.
Overall, this code will turn an LED on and off in a repeating pattern with a 0.5 second delay between each state change.
If you have some problem using machine import, follow the guide to fix It in the previous articles about MicroPython.
Probably at the start, you get:
Quit: Ctrl+] | Stop program: Ctrl+C | Reset: Ctrl+D
Type 'help()' (without the quotes) then press ENTER.
LED ON
Traceback (most recent call last):
  File "main.py", line 7, in <module>
KeyboardInterrupt:
MicroPython v1.19.1 on 2022-06-18; ESP module with ESP8266
Type "help()" for more information.
>>>
But if you reset the device, the program starts correctly:
LED ON
LED OFF
LED ON
LED OFF
LED ON
LED OFF
LED ON
LED OFF
LED ON
LED OFF
LED ON
LED OFF
LED ON
LED OFF
LED ON
LED OFF
LED ON
LED OFF
LED ON
LED OFF
LED ON
LED OFF
LED ON
Thanks
Mastering esp8266 programming with MicroPython
- MicroPython with esp8266 and esp32: flashing firmware and using standard tools
- MicroPython with esp8266 and esp32: flashing firmware and using Thonny IDE
- MicroPython with esp8266 and esp32: flashing firmware and using PyCharm IDE
Mastering ESP32 programming with MicroPython
- MicroPython with esp8266 and esp32: flashing firmware and using standard tools
- MicroPython with esp8266 and esp32: flashing firmware and using Thonny IDE
- MicroPython with esp8266 and esp32: flashing firmware and using PyCharm IDE